Changing gears from the paint pots prototype that didn't work out, I proceeded to work on the mechanics that would control the geysers. Using the same cam wheel and lever design as my previous animation controllers, the new mechanism would require a larger space to operate in, due to range of motion required by the geyers rods themselves. The water columns are suppose to come out of the ground roughly 4-5", and retract fully into the ground. This fairly large movement requires large cam wheels to control them, unlike the marmots and elk that only move about 1/2" each way or less.

The mechanism was designed based on the speed of the motor, which would time how fast the geyser columns come out of the ground, pause, and then retract into the ground. When I was cutting and machining the cam wheels and figuring out the timing, I pulled out the cam wheels used on my 20,000 Leagues Project as a test. These disks were used to control the motion and timing of the divers in the shark attack scene. To my surprise, the motion produced by these disks turned out to be near perfect for this project and so I ended up using them as is for the geysers! Part of the 20,000 Leagues project relives in Nature's Wonderland!

When the mechanism was ready, I installed the geyser themselves, consisting of the acrylic rod with Mod Podge and the styrene containment tube. The styrene tubes actually sink down past the original masonite layout base and into 3" of void space from the frame that was added when I retrofitted the layout last September. (The combined height of the two empty spaces, from the frame below and the elevated scenery, dictated the height of the geysers).
To add a dynamic effect at night, the geysers were rigged with white LED's that shine upward. Since the geysers are clear acrylic rods, the light fills the whole rod like a fiber optic and looks spectacular at night.

The rockwork scenery that provides a backdrop for the geysers and paint-pots has been neglected along with the rest of this corner for some time. Since the layout rotated during my studio revision during the summer, this corner is the first thing you see when you enter the room. Unfortunately, the view isn't pretty, with the exposed backside of foam rocks, and a countless wires from the circuit board to the relays that was put in. To really fix-up the rockwork, and totally clean up this corner, I had to install the first piece of fascia on the layout--starting here. With a few pieces of masonite, I cut the contours of the rockwork and screwed in the piece (over the nicely-stained frame below-- Oh well!). This piece created quite a bit of space between the rockwork and the masonite for scenery; it wasn't until now that the "end" was defined and the scenery on the hill behind the rockwork can finally be put in. The void space was filled with aluminum foil and my favorite "miniature concrete" aka Celluclay was poured over the surface as the base for scenery.


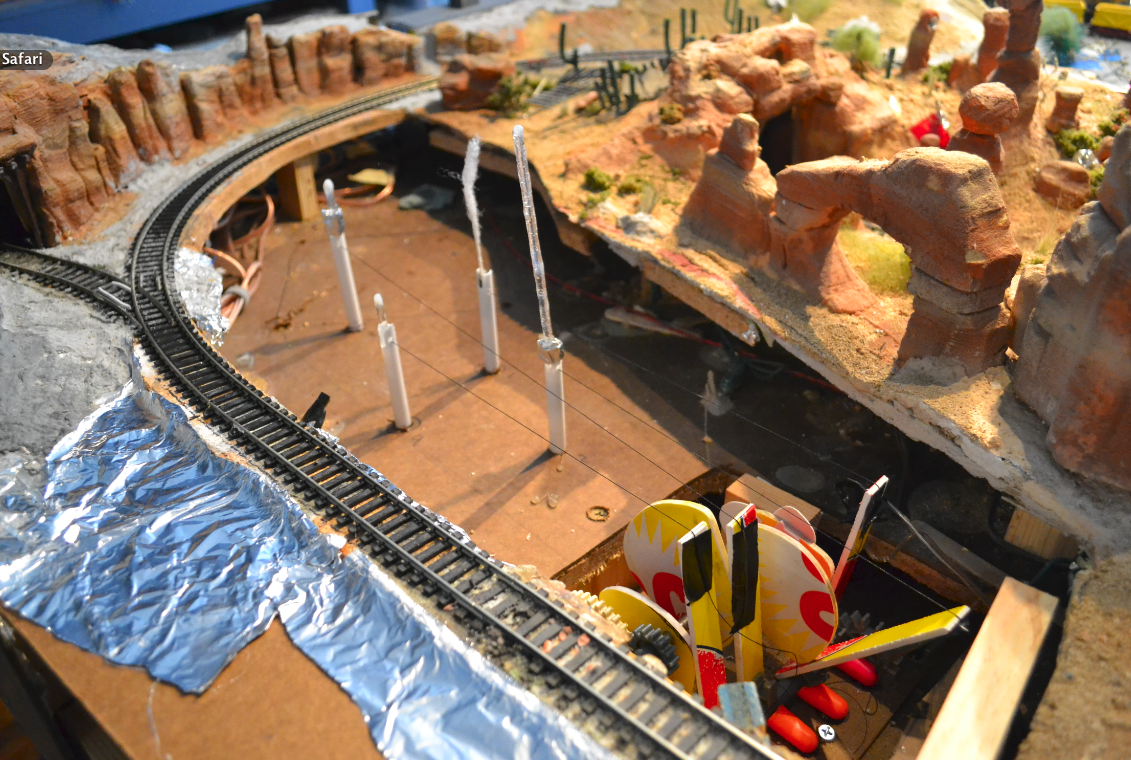
Since there is quite a bit of electrical including LED's, relays, and many other wires yet to be installed below the rockwork, I cut "windows" into the masonite fascia so I can access the circuits and also create a neat viewport for showing off the complexity of the wiring. "Worklights" were also installed so I can swap out relay's easily or trouble-shoot wiring without trying to hold a flashlight.
The faux spur line leading to the tunnel was created using scrap track. This time it came together perfectly; unfortunately, it took four versions to get to this one!


Also at this time, the speaker for the Living Desert was installed. This speaker will broadcast sound effects that will include coyote howls, geyser spurts, tumbling rocks and blowing wind.
When the geysers were operational and the kinks worked out (at least for now) a piece of masonite provided the ground level and once again, celluclay was used to seal everything off.

The geysers themselves were remade out of foam, much more accurate overall than the previous sculpey one's used in testing above.

Also getting remade are the paint pots. Since the mechanized version was abandoned in favor of a simple-- just detailed-- static one, foam was carved to create the new paint pots. These ones are the most accurate depiction of the originals thus far. Once they were sealed, enviro-tex was used to "level-out" the liquid surface, which would be painted in the respective color of each paint pot. The paint job and color scheme is much better this time around.


Scenery work jumped to on top of the tunnel as greenery starts to take shape. Several pine trees will line the hillside. Here you can also see the geysers painted and the paint pots piece being placed. On the left rockwork is starting to cover the right side of the tracks for the first time.

Unfortunately, there isn't enough room (by about 2"!) for a strip of track to represent the Santa Fe & Disneyland RR. While this is a selectively compressed layout, there just isn't enough space between everything for it to feel natural and not squeezed. I guess it'll have to be something in the backdrop!
Once the ground-cover went in and set, the colorful swirls once again appeared.

Next year (Ha! next year...) a video will be put up showing off the geysers.


Farther down the track, at the bend where T-rex bones will bake in the sun, is the nasty junction where countless wires and the two sections of the layout meet. On top of that-- no pun intended-- is the Mule Trail which leads to Natural Arch Bridge. In order to "clean-up" this area, more masonite fascia made it's way over here to hide the mess. The left photo shows the bundles of wire exposed and on the right a streamlined look at the same area.
Let there be light! Part 2
While areas of the layout are getting scenery and greenery, another aspect of the layout is given a second look: Nighttime lighting.
When I started installing the lights for night operation, it gave the layout a whole new dimension. This was all done with incandescent 12V lights. While it was neat when I started putting the lights in, it wasn't until installing the geysers I knew they could be better.
With the geysers came the LED's to illuminate them. I was impressed by their vibrant-ness that made the incandescent bulbs look quite dull. At the time of the installation of the incandescent bulbs during the summer, I didn't really have much experience with LED's until a few experimental projects that made me learn a lot about them. Considering the transformer running the lights was getting overworked by too much power being drawn, I decided to go bold and ditch incandescent lighting and go LED.
While it was a bit painful having to tear out the bulbs already installed, it was helpful that wires were already run to those locations. Once I dialed in the right resistor for each LED, the results were very satisfying; much more brightness and color than what was achieved before. It was well worth the rework.

This corner of the Living Desert is the first section to go full-LED. Newer sections will follow suit, while previous areas already rigged with lights will be a hybrid of both kinds of lights, like Bear Country, for example.

Bear Country Lanterns
Speaking of night-time lighting, I decided to "plus" the tunnel portal at Bear Country a bit.
A few months ago I was doing a night photography session at the park and I took this photo of the said tunnel.

I thought the lanterns added another layer of dimension not only in the photo, but also the Bear Country environment. These would make a neat addition to the layout!
Using LED tealights that I got from Target for a few bucks, I stripped off the LED's and wired them onto the night-light power line. I wired the two in parallel so the flickering is a little smoother.
They came out pretty good. The video is dark, but it shows their flicker well.

As cool as they are, when I started doing research for the trestle truss, I realized after looking at early photos that the lanterns were a later addition and were not part of Nature's Wonderland when it was open! Oh well, screw accuracy on this one, I'm keeping these!
Still on the subject of LED's and lights, the first block signal went in; this one is at the geysers. There are four in total, and will allow two trains to run independently and not in each-other.

Getting some "Support"
Meanwhile in Bear Country, the trestle bridge that hadn't had any supports or truss-work ever since the track was relayed almost two years ago finally got what it needed.

Built out of balsa and basswood strips, this is the most accurate trestle to-date, with this one being the 3rd incarnation. I had to do my own drawings in order for it to fit right in the tight confines of Bear Country.

Here's the truss in position for a test fit. You can tell how tight everything is over here. Although shorter in height and length than the prototype, it doesn't look too bad!
Rainbow Ridge: Back to the drawing board... literally.
After being ripped out and left vacant and untouched for two years, the little mining town of Rainbow Ridge took it's first step in progress. The new Rainbow Ridge will have an emphasis on details and accuracy, and order to do that properly, drawings as accurate as possible will have to be made. The first set of elevations have already been drafted, with more to come.

Once they looked fine to me, they were reprinted and pasted onto card with spray adhesive for mock-ups to give me a better idea of how they'll look.

So far, that's only half the town!


2 comments:
Your progress is looking fantastic. I really like the lanterns and their flicker.
Wow. Just wow. Awesome update, amazing progress. It really is a work of art.
Post a Comment