Battling Elk
After slowly developing Bear Country over the last few months, I found the next big thing to develop and install was the Battling Elk. After working with the Marmot tunnel, it was easier to work on the surrounding features when the piece was put in, rather than finishing off everything and having to rip it all out later if changes need to be made. As with the Elk, I needed to sculpt the fighting duo and put them on a mechanism and then drop the whole unit in. In order to determine the movement and size of the mechanics that will move the Elk back and forth, I needed the Elk themselves.
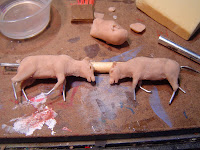
I set to work with a handful of Super Sculpey and some reference pictures and measurements of real Olympic Elk. After many hours, one was produced and few more hours later, a second. I'm very pleased with the results. When I originally took on the project almost 6 years ago, I wasn't really a good sculptor at all, especially small animals-- which really doesn't make Nature's Wonderland a good project for a 14 year old, especially when the attraction originally boasted having "over 200 lifelike animals". Over time, I realized this WAS the perfect project for me to do, since it forced me to practice and get better at sculpting, and that's shown in this latest example.
When the sculpts were done, baked and ready for the next step, I mocked up the area where they would be placed in order to get an idea of the space I have for the mechanics. Unfortunately, since this is a selectively compressed layout, it's really cramped in Bear Country and Beaver Valley. A piece of plastic represents the size of figures and their orientation. In order to give the terrain a natural look, I had to figure out how much area the hills sloping up to the Elk (they were on a hill on original attraction) and mechanism would eat up. So, as a result, a bunch of markings were made in the Beaver river for potential shifts in the river.
 |
| Planning out the Battling Elk. Markings are made for potential shifts in the Beaver River. |
 |
| The original plastic moose that have been standing in as my Battling Elk for the last few years |
So the elk figures I made are put aside, awaiting their smaller cousins to be made and implemented. At that point, I decided to change gears.
Wires, relays, reed switches, and more wires.
Since the layout was still in a developing stage, now is the time to do some crazy wiring considering it's going to be a lot harder to do later on a finished layout. When it comes to crazy wiring, I'm talking about the block system and "auto-stop" system I'm putting in.
The layout is divided into four blocks. Each block will be wired so at the flip of toggle switch, the block can be controlled by one of two power packs, thus a two train operation.
 |
| The four blocks on the layout |
. So, if a train were to enter a block, the block if just left would shut off the last foot, preventing a train behind to enter the already occupied block. The turned off block would be cleared and turned back on once the train enters the next block. This is all being done by reed switches and latching relays for simplicity. I tested this new system with two blocks and the results were really satisfying.
 |
| This is what brings the two layout sections together electrically: 15 pin connectors. 15 pins may be a bit much, but it'll allow easy expansion for sound, lighting, animation, etc. |
 |
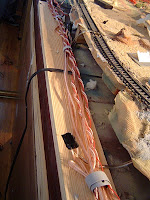
| The "spine" or the main electrical chase along the backside of the Living Desert |
 |
| "Relay Central". This is where all the relays, signals, and reed switches will connnect in a clean and organized fashion. The Caverns and Geysers are just out of frame above. |
Growin' Some Trees
After an article Model Railroader, I started experimenting with making trees out of wire branches, fiber foliage and ground foam. They aren't ready to be "planted" yet, but here they are:
When I get into full tree making production I might do a time lapse/tutorial.
Casa de Fritos PART 1: What's Left?
As mentioned earlier, when I was originally considering putting the relays and terminal block pictured above behind Casa de Fritos on the corner of the layout, I wasn't really sure how much space I'd have. I had never really looked into what made up Casa de Fritos building-wise, which needed to be determined if I was going to hide wires and relays.
 |
| An aerial shot showing Rainbow Ridge and Casa de Fritos highlighted in yellow |
 |
| Photo Credit for these three photos: Davelandweb |
I was also able to stitch together this panorama, from two photos from matterhorn1959.blogspot.com
 |
| Photo Credit for the two photos stitched together: matterhonr1959.blogspot.com |
I knew most of Nature's Wonderland had been destroyed when Big Thunder came to town, but what about Casa de Fritos? That was something I had find out. Once Casa de Fritos dropped their sponsor, the restaurant became Casa Mexicana and it remained pretty much the same. Then in the mid-90's, the area went under a major renovation and became Rancho del Zocalo. With the large patio right next to Big Thunder out front, it was really hard to tell if any of the Casa de Fritos facades still existed.
 |
| Color elevation for Rancho Del Zocalo, which was the first tip that Casa de Fritos might still exist in some form |
I had to get a closer look to see what's left and there was only one way to find out: FIELD TRIP!
Casa de Fritos PART 2: A Research Expedition.
When I had the chance, I made a trek down to the park on a mission to find ANY part of the facades left. I knew the Mineral Hall portion still existed and part of the restaurant entrance next to the Shooting gallery was still there, but everything else like the adobe hacienda style buildings I was unsure about.
 |
| (Above) Rancho del Zocalo entrance (Below) Casa de Fritos entrance Still the same! |
Here's the Entrance, now and before, top and bottom respectively. Once your eye gets past the ironwork and overgrown greenery, you can see that even the "bricks" showing through the the surface of the structure survived the renovation. (I really wanted to match the angle perfectly, but planters, railings and other diners prevented me from doing so).
 |
| What's all that in the back? Could it be? |
Venturing deeper, I see Mineral Hall is still there as it was more than 50 years ago. There's no blacklight rocks, but it's now the departure point for diners after they pay for their meal and exit onto the patio.
Mineral Hall, still here as well!
Panning over to the right, I was surprised by what I saw: EVERYTHING is still here!
Above now, before below
There is one major difference though: The facade of the Assay Office has been stretched vertically to meet the height of Mineral Hall, most likely to hide the edge of the facility building. A few doors and windows on the lower floor might have moved around, but other than that, everything is pretty much the same.
These two shots I tried to match the angle, despite all the clutter and tables around. Even the detail above the doorway still exists. And that pillar with a little blue paint on it that says "Casa de Fritos"? That's still here as well!
 |
| The hidden pillar that once had "Casa de Fritos" painted on it. |
So now, knowing that most of the former Casa de Fritos is still around, if I need some reference of measurements, I know exactly where to go!
I never did find that Frito Kid though.....
A Little Photoshop
Did some screwin' around in Photoshop the other day, giving it a slight retro postcard look.
Next Month:
In the month of March I want to get my block system all ship-shape and operational. Hopefully the new Battling Elk sculpts will go well and will finally get mechanized. I'm also getting ready to motorize the turnouts in Rainbow Ridge and Beaver Valley might get more developed.


