June saw a major step forward in the layout progress: the waterways in Bear Country and Beaver Valley were filled with.... water!

Once all the details and figures were completed and installed, it was ready to pour the Enviro-tex resin. I tinted it a dark green color and did the first pour to get the waterways "level".
 |
| The Beaver dams just before the resin pour and figure installation. |

Here's a look under natural lighting...

Beaver Valley getting it's water for the first time ever....

Another layer of clear was poured to fill any nook or crannies that didn't get hit. While a perfectly glass-like surface looks great, it isn't quite realistic or not good at hiding dust. To create waves, I dabbed Modge Podge--a gloss medium-- all over the surface. This also conceals any issues with the paint or scenery below the surface that could be visible.

A long-lens look at the creek between the two areas:

Here's the finished Beaver Valley, captured with a wide angle lens:


Waterfalls: Cascade Peak Rehab part 2
Over two years ago, I finished a complete rebuild/upgrade of the Cascade Peak structure. The crowning achievement of that project was the waterfalls. They looked spectacular when first installed and really added a sense of realism to the layout.

Fast-forward to today. Unfortunately, time and UV lighting have taken their toll on the once glistening waterfalls...

Now, it's one thing to have water with a slight color tinge, but to have it turn COMPLETELY yellow to the point it looks like sewage is not right! While the silicone caulking I used looked great first installed, demonstrated here, it's not the right choice long term.
Looking for a replacement, I looked over the materials I used on similar projects. If I were going to redo the falls, I had to use materials that didn't fade or yellow. The silicone Caulking is out of the question. Modge Podge was used on the Rivers of America section at one point, but that turned yellow too. Perhaps thick quantities is the culprit. As with any waterfall technique, I started with a piece of clear plastic or polyester sheet. Rather than adding to it with caulking or mod podge, I decided to shape the plastic instead, since I knew the plastic itself wouldn't yellow (I've used this stuff for years; some examples I used in the past still haven't been affected).
As a test, I dragged my soldering iron across the plastic strip in vertical streaks. I later formed the curve in it with a heat gun. Even as is, it looked great! I added shavings from grinded/drilled out casting resin to simulate the water breaking up at the bottom. I locked the bits in with a coat of Modge Podge (only lightly so if it did yellow it wouldn't be noticeable). As in the last set of waterfalls, I added faux spiderweb to create the mist. A little white paint on the top edge added a little punch in highlights.
Here's the test waterfall and the original waterfall it's replacing (the one on the left was actually the demo waterfall in my YouTube instruction video). You can tell how much the silicone caulking yellowed!

After the test waterfall, here's the rest of Twin Sister falls put in.

Wow! Even better than before! Not only will these not fade or yellow (at least for the next decade) they are more accurate in scale, proportion and form.
While the falls look great as is, I had to plus-it. As with the rest of the layout, I decided to add LED's for nighttime layout running, not just to Cascade Peak (which has never had lights up to this point) but also the waterfalls too. Inspired by the Matterhorn's latest rehab with it's new cool-white lit waterfalls, I decided to do the same.

There's one LED under each fall. Of course, that led to some scenery destruction to run wiring, but it was worth it. Here's Cascade Peak with it's flood lights underneath. The rest of the waterfalls are next for this major upgrade!
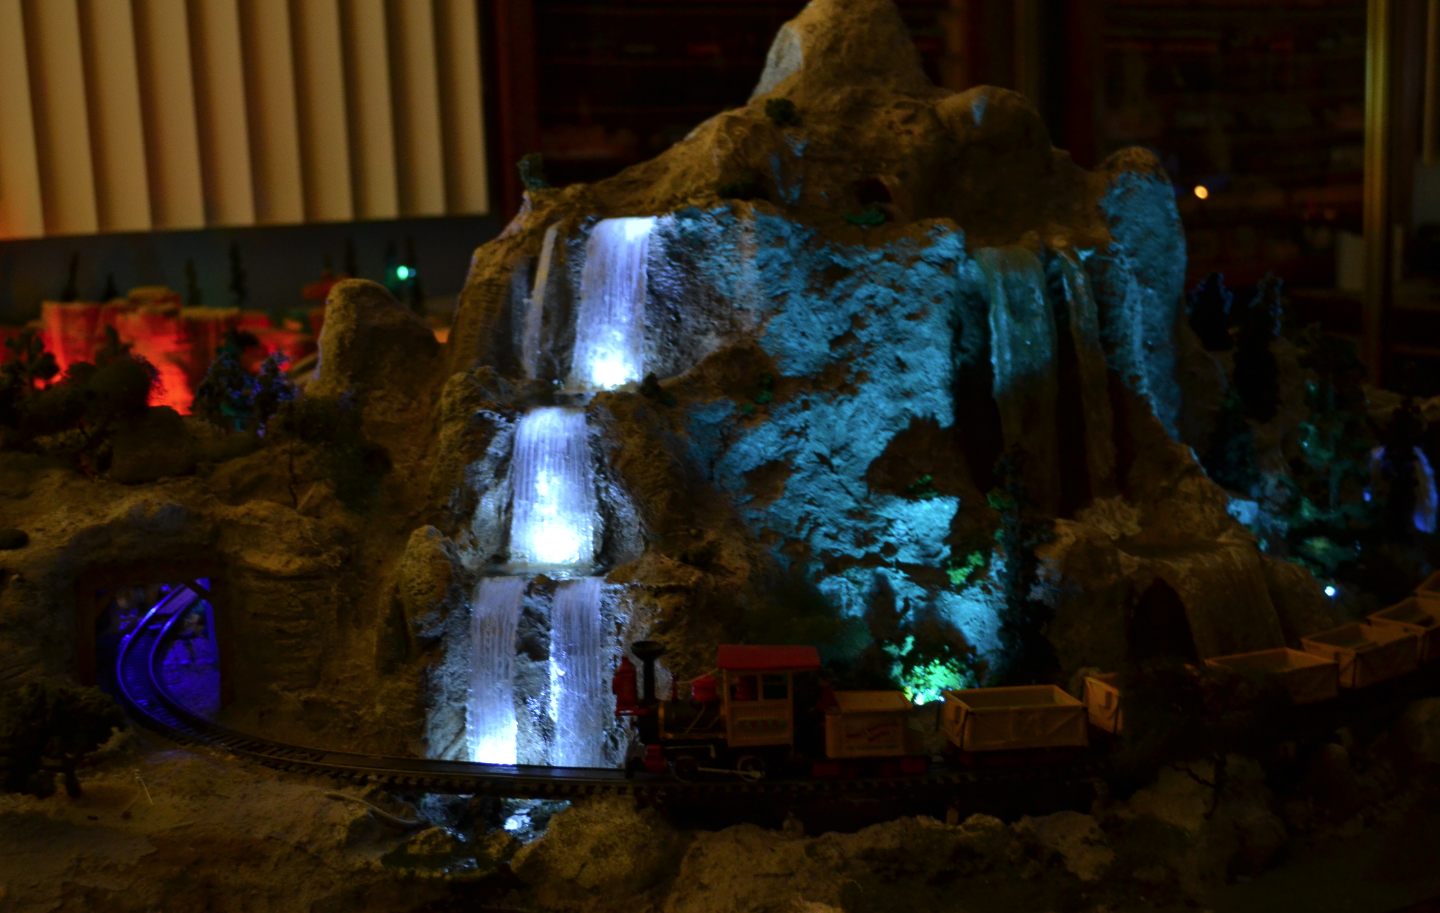
Onces the LED's were in position, I poured the pools for each waterfall with enviro-tex.


A neat thing about these waterfalls is that the way the streaks were formed, the melted plastic literally makes them shimmer and shine in the light!

At some point I'll have a new tutorial to show this technique.
Watercraft: Adding Another Attraction
When Bear Country and Beaver Valley were finally tackled with their waterways, I knew the next section to get poured with resin would be the Rivers of America side of Cascade Peak. The main issue is the large spanse of resin that has to be poured in front of Big Thunder falls. Of course, to break-up the space, you need to add something....

A Keelboat!

Currently, a 1:48 version of the Gullywhumper is being made, so far only the hull has been fabricated. This will be the third attraction to be featured on the layout; something I didn't anticipate 7 years ago!

