Rainbow Rehab
As I was starting to work on the fascia that surrounds the layout back in January, I started to look at the Rainbow Caverns scene. There have always been two windows, one was the main scene you looked at, the other was a housing for the soundboard that runs the audio for the scene. That housing was usually covered up with a panel held by a magnet. I decided to move the soundboard to the other side of the Caverns, the same side as Mineral Hall, to streamline my wiring. As I cleared out the housing, I was surprised at the amount of space. They it occurred to me: What if I put another scene in?
I was always disappointed with the size of the Rainbow Caverns, compared to the previous versions that were in the same spot. One waterfall that always caught my eye was Staircase Falls, so I felt it was appropriate to add that feature to the extra space and give the miniature riders more scenery to see.

I started by clearing and sealing the area where the new falls would go. I carved the rock formation out of a dense foam (balsa foam)

Once painted black, I shaped waterfalls out of thin clear plastic and roughed them up with a soldering iron, a standard for waterfalls on this layout.

I painted the waterfalls with blue black light paint and as a bonus, the pools where poured out of Enviro-Tex resin, tinted with blacklight paint so the actual water would glow under the UV LED's.

Since I was in the Rainbow Caverns mood, I went back and spruced up the rest of the caverns. New black paint, new resin water, and new UV paint helped refresh the scene.


And here's the two scenes next to each other, as seen from the fascia.

World of Motion
A continuing trend, something breaks on this layout, and needs to be fixed. This happened on the spinning rock animation in the Balancing Rock Canyon area. The gearing had become dislodged from it's mounting, because it comes from the era where I hot glued everything instead of securing it more solidly. Knowing I had to dig up scenery, I thought this animation could use an improvement and enhancing. Seems pretty easy, but this section of this post spanned a period of 6 months!

Going back many years, I had sketched out how to make the spinning rock move like the one in the attraction did. The spinning rock would spin and traverse to the end of a teetering it was spinning on, and the teetering rock would tip up and send the spinning rock back the other way. You can see this to great effect in the Disneyland show "People and Places" quite well when the ride was the Rainbow Caverns Mine Train.
Check the 13:30 mark
It looks a little cartoony, as did the majority of the first incarnation of the mine train.
Later for Nature's Wonderland, the effect was improved. It's really hard to find footage of this thing in action, but sharp eyes will see it in action in the background of "40 Pounds of Trouble" with Tony Curtis
Check the 3:23 and 3:39 mark.
Translating this kind of motion to miniature proved to be quite a challenge. In fact, it would have been easier to build on full size because of the size of the mechanics!
The main challenge is getting the spinning rock to spin and translate in a very small space, which also has to tip, and not have any mechanical aspects exposed, especially where the tipping rock meets the main stationary rock.
I started with building the spinning rock carriage, which would traverse on top of the tipping rock. Again, this would be a lot easier in full scale, not 1:50 scale. The easiest solution was to have a thread (in this case "Ugly Braid" fishing line because of it's strength) pull a brass square tube segment back and forth on a brass square tube track. The thread would bend at each end through an aluminum tube and return to the center of the pivot point, so nothing would be exposed underneath the tipping rock.

I apologize for my messy desk for this batch of photos.
For the dynamic motion of what the spinning rock had to do, and for space compactness, I chose to animate with hobby servos. Taking my success from programming Arduino's for my Tiki Shelf and many other projects, I figures I would control the servos in a very dynamic and fluid way automatically as well as control a gearmotor which would spin the rock and have that motor slow down, and reverse direction with precise timing.

Here's the mounting for the gearmotor in the center, and the two servo motors. The one with the white horn tilts the tipping rock and the carriage for the spinning rock, and the one with the red pulls the thread to traverse the spinning rock.
Because of how complicated this animated "figure" is, this build would only reach the prototype phase, an improved one would be built for layout installation. So there's a decent mix of materials here, a little quick and dirty.

The early tests for motion came out great, it was when programming started, the project became a nightmare.
First off, I'm a mechanically and artistically based person. I make things that move that achieve a certain creative intent. Those who have tutorials on how to program Arduinos are not. Most videos on how to program a servo with an Arduino show you a boring sequence that moves one servo back and forth with no real application. I was able to program the servos to move, but only in a basic "key frame" style; meaning, I needed to have the servos accelerate and decelerate and switch directions in a very smooth manner--at the same time. This proved quite a challenge to do with Arduinos. I'm sure there's someone out there that could code something together, but I needed to animate and be able to adjust the timing of the motions easily, without having a long messy code to wade through (and I'm an animator from the graphics world that understands motion graphs, not lines and lines of code)
With coding becoming an issue, running the gearmotor became another. For some reason, the gearmotor would cause the servos to freak out and not obey the signals given from the Arduino. I tried many ways of filtering the signals and the wiring to the servo motor and I even tried a motor shield for the Arduino. Nothing quite worked. Knowing the servos worked good together I tried switching the gear motor for a continuous rotation servo which is basically a DC gearmotor with a digital driver. Audible noise from the gearing of that continuous rotation servo became a problem so I experimented with switching the DC motor with another 6V gear motor which worked better, but was "stepping" because of the digital signal. Again, I'm a mechanical and art person, not an electronic and coding person.
I tried looking online for smoother operation of servos and gearmotors together, but no one has ever done such a thing. The final nail in the coffin for ditching using an Arduino for animation was programming the gear motor and trying to accelerate and decelerate servos at different time intervals at the same time.
Then I found my solution:

The Polulu Mini Maestro.
THIS THING IS INCREDIBLE!
With this tiny little board, I was not only able to move the servos to where I needed them, but also adjust them IN REAL TIME making animating and programming easy, and I can adjust the acceleration and timing parameters fast. This things does a lot of things the Arduino could only dream of for moving servos. Spinning the gear motor still became a challenge since DC motors can't be rigged to this board directly. Through lots of experimenting, I acquired a Simple Motor Controller 18v7 which takes RC signals and converts them into DC current for a DC motor.

So now the spinning rock portion could slow down and speed up with precision!
I haven't done much programming with the spinning rock itself, but I did get a "walk cycle" of the tilting rock and traversing motion on camera.
This first part of the video shows the figure moving with the Mini Maestro, the 12V DC motor for the spinning rock just running at 5V with no programming. I sculpted a rock formation and vacuum-formed it in plastic to serve a hollow shell. This is only for demonstration purposes. The second part is using the original Arduino set-up with the "keyframe" basic programming without all the finessing.
You will notice a bunch of machine nuts spinning around the gearmotor. Those are acting as weights to keep the cable for the spinning rock down. Since the spinning rock moves up and down the the tilting rock, the cable needs to extend. This is done with a square brass tube sliding inside another square brass shaft on the gear motor. The weights bring the whole cable down so rock doesn't float when the tipping rock tilts back down. A flange on the spinning rock itself pulls the cable up as the tipping rock tilts.
Once things proved out on this design, I went to prototype #2.

I wanted to streamline and make the whole rig more durable so I went full brass and metal construction which took the fragility out of the whole thing. I simplified the design with less parts. The thread to traverse the spinning rock now converges at the pivot axle for tipping rock. The support structure is minimized and simple.


The biggest change is the gearmotor for the spinning rock. I went with much smaller gearmotor (still 12V, but different RPM). This motor is about the size of your thumb, so size isn't a problem. Instead of having the brass tube extending feature, the motor moves with the tilting rock and traversing rig at the top. No need for a cable, just a rod provides motion to the spinning rock. I figured I didn't need to hide the cable in the previous version as much so a solid rod work just as well. Again, less parts.
I don't have a video of this one yet, but I will at some point. I've focused my attention on other parts of the layout so this experiment has been shelved. At this time, it won't be installed on the layout, since I'm actually enjoying it more as a stand alone study. In the mean time, I did repair my spinning rock on the layout, with another gearmotor like the one in version 2 of the "enhanced" spinning rock.
As I repaired my spinning rock, I took the opportunity to rehab the rest of the Balancing Rock Canyon mechanics. The original LEGO motors began to show their age as they became noisier and noisier. I cleared them out and installed 60 RPM gearmotors. Much quieter!


Rainbow Ridge Revisions
Going back to Rainbow Ridge, I started back up with building the town structures. I began to pick out windows for the El Dorado Hotel when I noticed something with my buildings. For some reason, they didn't really feel right. I couldn't quite pin what it was. Then Davelandweb posted a photo that revealed what it was.

Ha! The buildings I made were too big! It turns out, as I was drafting my drawings for Rainbow Ridge, the forced perspective fooled me pretty good and I drew the buildings pretty much full size to the scale of a proper person. After noticing a few other details I didn't quite get right, I needed to rebuild the buildings I pretty much just recently built again. ARGH!
But this wan't a bad thing, luckily I caught this problem now and not later, otherwise the all the buildings wouldn't fit on the platform! So off to the work table!
I scaled my drawings down 20% which felt about right looking at the photo above. I started with the Assay office which really shows the scale difference.

The rest of the buildings and their properly scaled rebuilds followed.

Now that I was caught up with the buildings that needed to be rebuilt, I moved forward to some new buildings.
El Dorado Hotel was the next new one the be made. I was able to document the general process of this building. I only have a few photos of the other ones since I'm able to churn these buildings out so fast I forget to take photos of them .
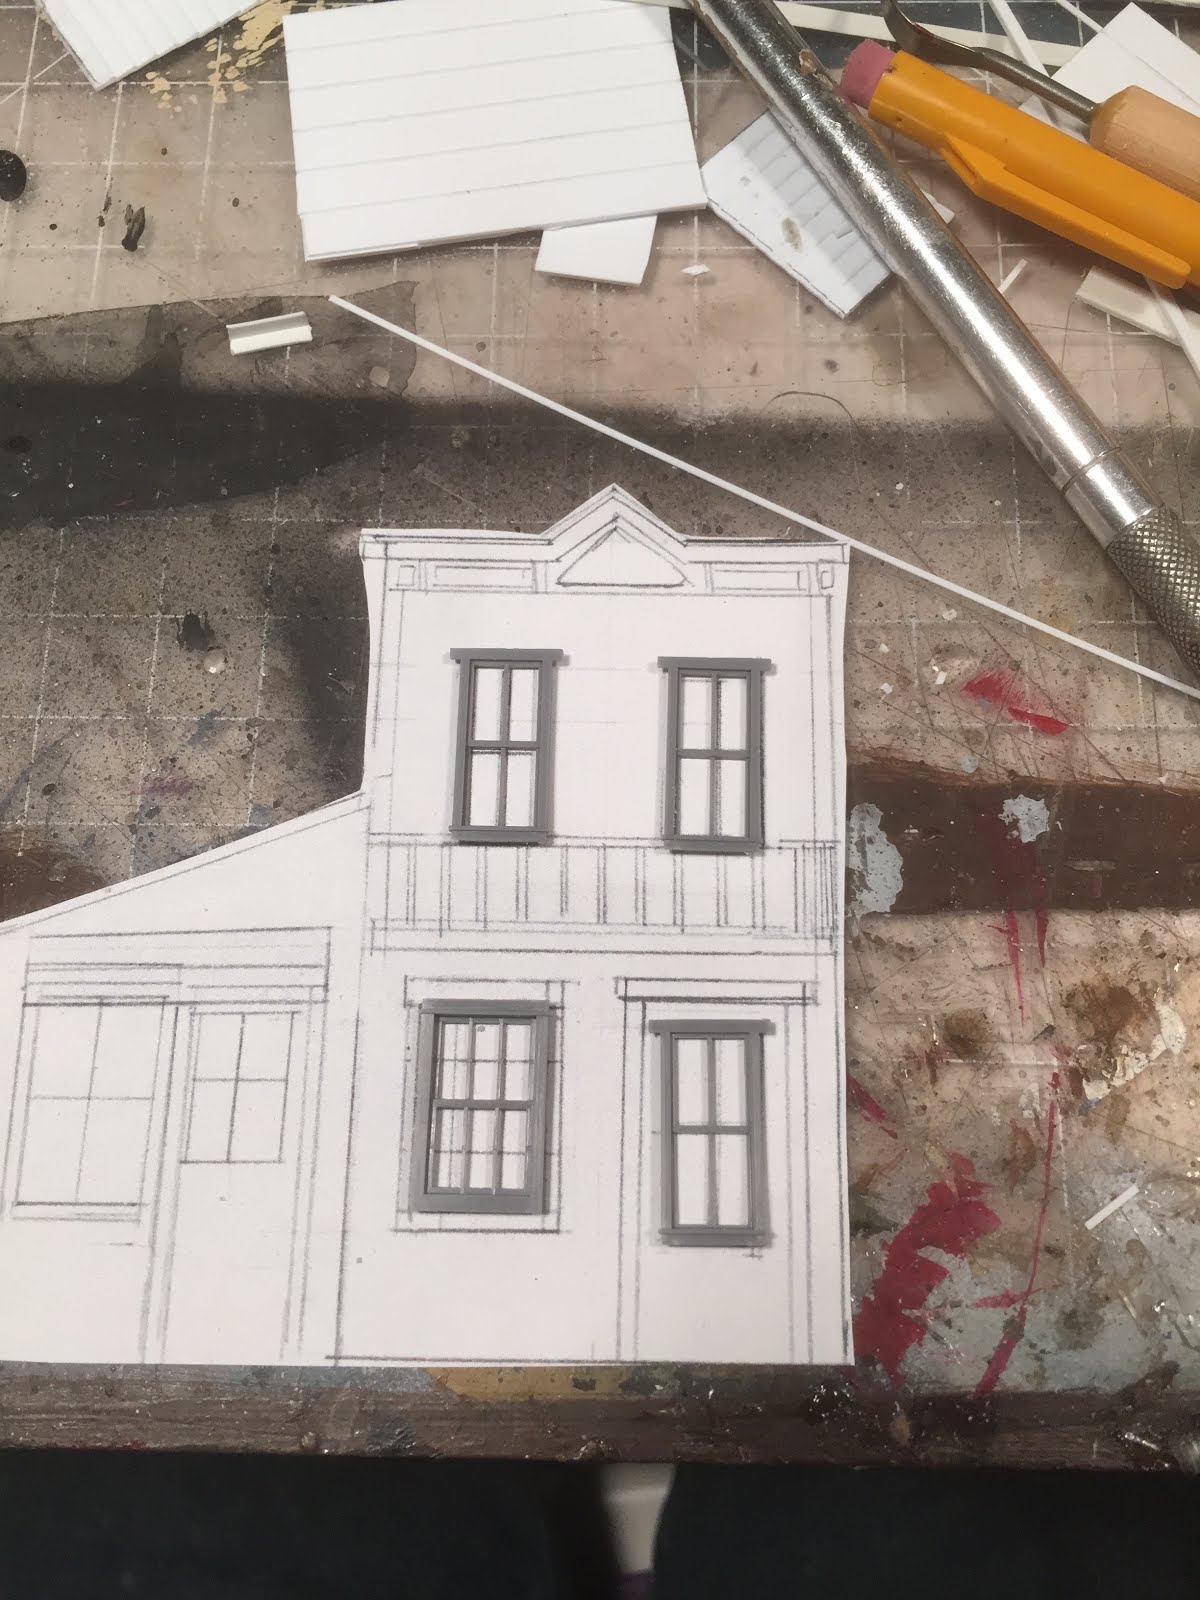
First, I start by laying out windows from Tichy that could be matched or modified to fit the buildings I'm gonna build. The Tichy windows (I'm using a combo of HO and O scale windows) help speed up the tedious process of making windows, but can't be used all the time. Half of the windows from Rainbow Ridge had to be built from scratch, which isn't hard, just cumbersome.
Once windows are picked, they're modified if needed.

The structures are built from sheet and strip styrene. I use a lot of Plastruct and Evergreen styrene. Clapboard and groove styrene is used to great extent in Rainbow Ridge.

For the more detailed trim, especially on the El Dorado Hotel, I did this with layering multiple strips of styrene. Many different sizes were used.

Some more detailing at the top

Then the building become more 3-dimensional with the facility walls, done with more clapboard and groove styrene pattern sheets

I modified a railing from Plastruct for the railing on the hotel

And here's the first decal test, done with Micro Mark inkjet decal paper.

Here's some shots of the Saloon and Clarion being constructed, each with their own unique details


Like the Miner's Hardware, the General Store had to reflect the adobe construction style. This was done with a combination of dense foam and wood for the rounded look.
The Opera House followed, as well as the tunnel portal right next to it. Both built from my own drawings.


And here's an overall look at the model. The buildings are gray for now, painted with primer. Once they're all built, I can look at their shape and slowly add in color. The color palette will be done last so I could use less paint, but also use the same colors in multiple areas so everything has a cohesive look.

Across the track, Casa de Fritos and Mineral Hall came into existence for the first time. These were built using the same techniques as the General Store and Miners Hardware.


"All Aboard the Mine Train..."
The next generation of trains for the layout is being developed as of this writing. Brand new trains will soon be rolling through Nature's Wonderland, with the Kato drive being the key player, as discussed in previous updates.
Building the tender shell was difficult, but was able to materialize by slowly tweaking the design.
I started with making a frame that could screw to the motor truck, making it removable to maintenance.


The majority of the tender was done out of brass strip, for ease of construction and rigidity. I remember making the last tenders out of styrene which was pretty tricky.


Unfortunately, with the Kato unit, adjustments had to be made, which sacrifices being prototypical. Luckily I can live with these changes. Mostly it was raising the toolbox on the back to hide the motor, and adding a block for the driver to sit on on the other end.

For weight, I added some tungsten weight which will give the tender a LOT of pulling power, moreso than the bachmann porter I have now!


Here's the tender shell with the toolbox modification. And below with the Cast Member seat.

Here is the tender on the spur track in Rainbow Ridge. The Bachmann porter chassis will serve as a base for the new locomotive that will be pushed by the tender. That's where it is now, more to come!

"I'm Mike Fink, king of the river!"
After building the hull many years ago, I'm proud to say that the Gullywhumper is almost ready to set sail! I made a new hull from dense foam and the super structure out of sheet and strip styrene. This vessel was built from a drawing I saw on eBay a long time ago and many photo references. Just a paint job with weathering and people will prepare her for the miniature Rivers of America!


This and That
The lighting is slowly getting refined for Rainbow Ridge. After deciding to simplify the lighting package for the area, I switched out my lanterns for LED ones. Since the incandescent ones were hot as heck, these are much appreciated. I had to rebuild them since they were so tiny, but it went together fairly quickly. These are warm-white 3mm LED's.


Unfortunately, I lost the flickering effect to the lanterns. The wiring just got way out of hand for an effect that was hardly noticeable. I am going the route of Dave Meek over at Thunder Mesa (Which is AMAZING by the way) and going for the less is more approach and using flickering tea light LED's. The saloon above has one inside as a test. Here's the General Store with another test. Looks pretty good to me!

Oddly enough, one of my favorite things about this layout is something I have yet to build and it didn't even exist on the real thing: the control panel.
I have a weird fascination with control panels, especially for ride systems like at Disneyland. Over the last several months, I've been collecting parts for the control panel that will be able to activate and control every feature on the layout. From animation, to sound, to lighting, to turnouts, to relays, to dispatch intervals, and the trains themselves. I've studied the control panels at Disneyland from the time I worked there and I've collected buttons and switches and dials from eBay that are identical to what's being used to send boats on Pirates of the Caribbean, Space Mountain, and others. I'm modeling my panel off Big Thunder and few other attractions and giving it my own mild spin, graphically. For the function of all the buttons and switches yet to be installed, I've consulted my girlfriend who worked west side attractions for a number of years to verify how the "station stop" and the infamous "E-Stop" worked as well as the general layout of everything. It's a little high-tech for the 1960's attraction I'm creating, but it's sure fun to design. I considered a retro version with toggle switches, but this for some reason seemed more intriguing.


