"Howdy Folks! Welcome to the little mining town of Rainbow Ridge, the gateway to Nature's Wonderland"

This is my documentation of my miniature re-creation of the long-gone Disneyland attraction: Mine Train Thru Nature's Wonderland. This is a selectively compressed model railroad, in On30 scale at 5' X 7.5' that has been in progress since September 2005. In May of 2016, I finally got the layout to a point where I declared it "finished".

I started the layout when I was a sophomore in high school with basic skills and over the years the layout has been improved and reworked in drastic ways to match my ever improving model making skills. In fact, since I started rebuilding the sections to better quality and standards, I've actually created a whole new layout, piece by piece.

This is a stand-by basis project without a deadline, so it tends to hit the back-burner a lot due to other things with higher priorities. But whenever I can, I'll give an update when there is something worth talking about. All of my updates since day one are here, which include photos, videos, and plenty of rambling notes and descriptions.


January 2012 Update

For the first time in the layout's history, something new has appeared that has never existed (and will never need to be redone!): the dinosaur bones.


Using a handful of reference photos, I sculpted the "the sun-bleached bones of an ancient animal" from scratch out of sculpey. Unfortunately, there weren't any suitable toys or models of T-Rex bones that were the right scale, or if they were, the right quality or accuracy. As with anything on this entire project, starting from the ground up was necessary.  Since there were some angles missing that would have been helpful, I researched T-rex bones in general and found proper reference for a few aspects. Of course, there were some discrepancies between modern day research and what the sculptors in the early 60's knew about dinosaurs. Keeping with the era, I stuck with what was in the ride for this project.

Also for the first time, the part of the layout where the bones will go is being developed pass the initial paper mache layer. The last time this section of was touched was three years ago, and that yellowed paper towel foundation was ripped out.


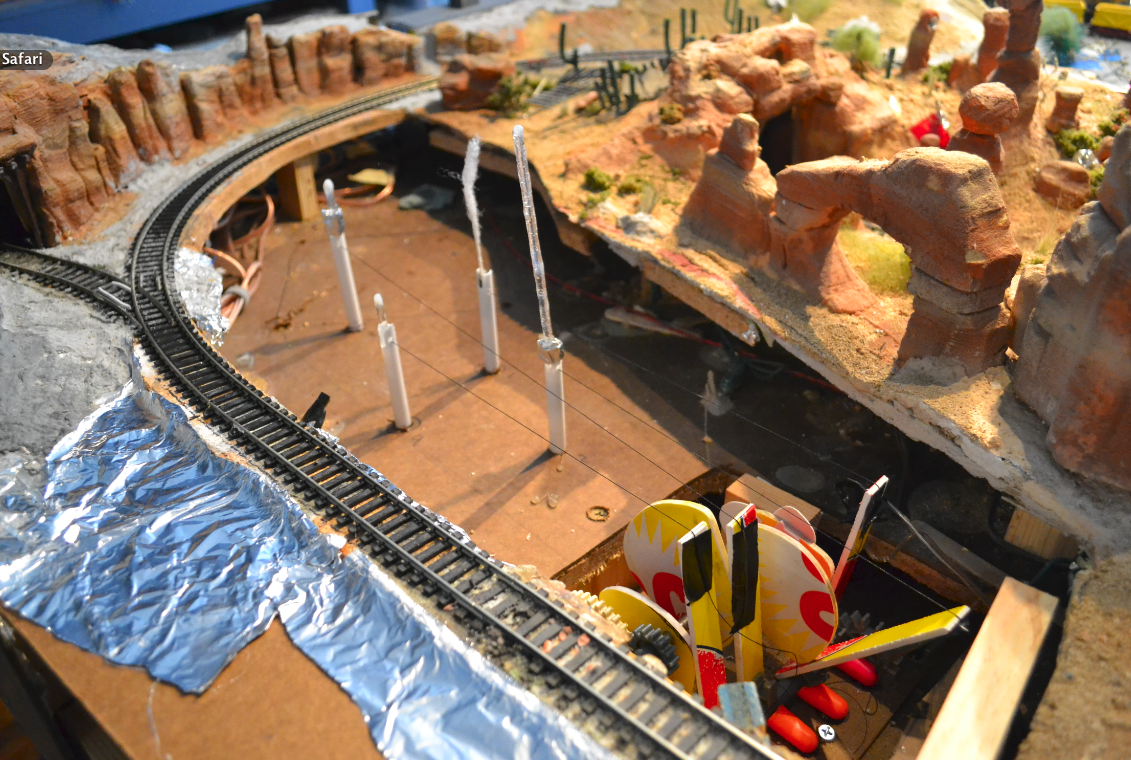
You can see the mess of wired and cables right under this spot. As with new installations, everything is done on a piece of masonite, worked on comfortably at my desk and then fixed into place when scenic work is done. 


Here's the bones on the foam rockwork and the hillside with the first pass of celluclay. This is a test fit, and once all the adjustments are made, the next step is to paint and apply scenery. 


Above is the entire vignette ready for primer and below is the first paint and scenery pass.


Once put in it's final resting place (no pun intended) final washes were applied to the bones and the edges were blended into the nearby scenery. 


Once the scene was installed and the edges blended, scenery work began to "bleed" into other nearby areas, even as much as jumping to the other side of the tracks at the watering hole. 

This small "water feature" in the back section of the desert was first installed almost exactly two years ago when I was experimenting with different kinds of ways of representing water. The method I used was a piece of clear plastic over a sunken hole to represent the water surface. 


As with anything built on the layout over two years back, it was looking rather tired and needed a quality update. 

Lately I've been experimenting with the common model railroad water material: Envirotex Lite. This two part resin cures to a hard, shiny surface and can be layered to create that impressive illusion of depth. After some tests on a few scrap pieces, I decided that this was the material of choice for not just the watering hole, but also all the waterways for Bear Country, Beaver Valley, and even the Rivers of America. 

This watering hole is the first application on the layout to use Envirotex Lite, and refinements will come after this for other sections. 


Since this material is self-leveling, rather than actually pouring the resin right on the model--where I'm unsure of it's slanting--I did the new watering hole on separate piece. The above photo shows the first layer of Envirotex in a foam basin, which will be installed once all the layers are poured and cured. 

The old watering hole was ripped out and the new one was put in once all three layers were poured and cured. 


The bottom left photo shows the new piece placed into position and the bordering areas blended in. Rather than having a glassy smooth surface, mod podge was applied to add a little ripple to the water (and hide the dust).


As soon as that dried, the new watering hole is complete!


It looks even better when viewed from a lower angle!


More than 40 pieces of miniature cacti are ready to be installed. The Woodland Scenics "Scene-A-Rama" kit cacti were given extra treatments like the proper color and highlights before being planted.


I have to say, this area made quite a transformation over the last few weeks. It has never looked better and it further amps me up to keep going on other sections. 


This whole back section, from the dinosaur bones to the faux spur tunnel--the area of attention for the last 3 months--is the result of a lot of new and restored work. Hopefully it will never need another facelift again!


For kicks, here's the same area as it was 2 years, 6 months ago, and as it is now from the same angle, with a total refresh.


Quite a difference, huh?


November/December 2011 Update: Full-Speed Ahead

Geysers in Motion

Changing gears from the paint pots prototype that didn't work out, I proceeded to work on the mechanics that would control the geysers. Using the same cam wheel and lever design as my previous animation controllers, the new mechanism would require a larger space to operate in, due to range of motion required by the geyers rods themselves. The water columns are suppose to come out of the ground roughly 4-5", and retract fully into the ground. This fairly large movement requires large cam wheels to control them, unlike the marmots and elk that only move about 1/2" each way or less.


The mechanism was designed based on the speed of the motor, which would time how fast the geyser columns come out of the ground, pause, and then retract into the ground. When I was cutting and machining the cam wheels and figuring out the timing, I pulled out the cam wheels used on my 20,000 Leagues Project as a test. These disks were used to control the motion and timing of the divers in the shark attack scene. To my surprise, the motion produced by these disks turned out to be near perfect for this project and so I ended up using them as is for the geysers! Part of the 20,000 Leagues project relives in Nature's Wonderland!


When the mechanism was ready, I installed the geyser themselves, consisting of the acrylic rod with Mod Podge and the styrene containment tube. The styrene tubes actually sink down past the original masonite layout base and into 3" of void space from the frame that was added when I retrofitted the layout last September. (The combined height of the two empty spaces, from the frame below and the elevated scenery, dictated the height of the geysers).


To add a dynamic effect at night, the geysers were rigged with white LED's that shine upward. Since the geysers are clear acrylic rods, the light fills the whole rod like a fiber optic and looks spectacular at night.


The rockwork scenery that provides a backdrop for the geysers and paint-pots has been neglected along with the rest of this corner for some time. Since the layout rotated during my studio revision during the summer, this corner is the first thing you see when you enter the room. Unfortunately, the view isn't pretty, with the exposed backside of foam rocks, and a countless wires from the circuit board to the relays that was put in.  To really fix-up the rockwork, and totally clean up this corner, I had to install the first piece of fascia on the layout--starting here. With a few pieces of masonite, I cut the contours of the rockwork and screwed in the piece (over the nicely-stained frame below-- Oh well!). This piece created quite a bit of space between the rockwork and the masonite for scenery; it wasn't until now that the "end" was defined and the scenery on the hill behind the rockwork can finally be put in. The void space was filled with aluminum foil and my favorite "miniature concrete" aka Celluclay was poured over the surface as the base for scenery.


Since there is quite a bit of electrical including LED's, relays, and many other wires yet to be installed below the rockwork, I cut "windows" into the masonite fascia so I can access the circuits and also create a neat viewport for showing off the complexity of the wiring. "Worklights" were also installed so I can swap out relay's easily or trouble-shoot wiring without trying to hold a flashlight.

The faux spur line leading to the tunnel was created using scrap track. This time it came together perfectly; unfortunately, it took four versions to get to this one!


Also at this time, the speaker for the Living Desert was installed. This speaker will broadcast sound effects that will include coyote howls, geyser spurts, tumbling rocks and blowing wind.

When the geysers were operational and the kinks worked out (at least for now) a piece of masonite provided the ground level and once again, celluclay was used to seal everything off.


The geysers themselves were remade out of foam, much more accurate overall than the previous sculpey one's used in testing above. 


Also getting remade are the paint pots. Since the mechanized version was abandoned in favor of a simple-- just detailed-- static one, foam was carved to create the new paint pots. These ones are the most accurate depiction of the originals thus far. Once they were sealed, enviro-tex was used to "level-out" the liquid surface, which would be painted in the respective color of each paint pot. The paint job and color scheme is much better this time around. 


Scenery work jumped to on top of the tunnel as greenery starts to take shape. Several pine trees will line the hillside. Here you can also see the geysers painted and the paint pots piece being placed. On the left rockwork is starting to cover the right side of the tracks for the first time. 


Unfortunately, there isn't enough room (by about 2"!) for a strip of track to represent the Santa Fe & Disneyland RR. While this is a selectively compressed layout, there just isn't enough space between everything for it to feel natural and not squeezed. I guess it'll have to be something in the backdrop!

Once the ground-cover went in and set, the colorful swirls once again appeared. 


Next year (Ha! next year...) a video will be put up showing off the geysers. 


Farther down the track, at the bend where T-rex bones will bake in the sun, is the nasty junction where countless wires and the two sections of the layout meet. On top of that-- no pun intended-- is the Mule Trail which leads to Natural Arch Bridge. In order to "clean-up" this area, more masonite fascia made it's way over here to hide the mess. The left photo shows the bundles of wire exposed and on the right a streamlined look at the same area. 

Let there be light! Part 2

While areas of the layout are getting scenery and greenery, another aspect of the layout is given a second look: Nighttime lighting. 

When I started installing the lights for night operation, it gave the layout a whole new dimension. This was all done with incandescent 12V lights. While it was neat when I started putting the lights in, it wasn't until installing the geysers I knew they could be better. 

With the geysers came the LED's to illuminate them. I was impressed by their vibrant-ness that made the incandescent bulbs look quite dull. At the time of the installation of the incandescent bulbs during the summer, I didn't really have much experience with LED's until a few experimental projects that made me learn a lot about them. Considering the transformer running the lights was getting overworked by too much power being drawn, I decided to go bold and ditch incandescent lighting and go LED. 

While it was a bit painful having to tear out the bulbs already installed, it was helpful that wires were already run to those locations. Once I dialed in the right resistor for each LED, the results were very satisfying; much more brightness and color than what was achieved before. It was well worth the rework. 


This corner of the Living Desert is the first section to go full-LED. Newer sections will follow suit, while previous areas already rigged with lights will be a hybrid of both kinds of lights, like Bear Country, for example.


Bear Country Lanterns

Speaking of night-time lighting, I decided to "plus" the tunnel portal at Bear Country a bit. 

A few months ago I was doing a night photography session at the park and I took this photo of the said tunnel. 


I thought the lanterns added another layer of  dimension not only in the photo, but also the Bear Country environment. These would make a neat addition to the layout! 

Using LED tealights that I got from Target for a few bucks, I stripped off the LED's and wired them onto the night-light power line. I wired the two in parallel so the flickering is a little smoother. 

They came out pretty good. The video is dark, but it shows their flicker well. 


As cool as they are, when I started doing research for the trestle truss, I realized after looking at early photos that the lanterns were a later addition and were not part of Nature's Wonderland when it was open! Oh well, screw accuracy on this one, I'm keeping these!

Still on the subject of LED's and lights, the first block signal went in; this one is at the geysers. There are four in total, and will allow two trains to run independently and not in each-other. 


Getting some "Support"

Meanwhile in Bear Country, the trestle bridge that hadn't had any supports or truss-work ever since the track was relayed almost two years ago finally got what it needed.


Built out of balsa and basswood strips, this is the most accurate trestle to-date, with this one being the 3rd incarnation. I had to do my own drawings in order for it to fit right in the tight confines of Bear Country. 


Here's the truss in position for a test fit. You can tell how tight everything is over here. Although shorter in height and length than the prototype, it doesn't look too bad!

Rainbow Ridge: Back to the drawing board... literally. 

After being ripped out and left vacant and untouched for two years, the little mining town of Rainbow Ridge took it's first step in progress. The new Rainbow Ridge will have an emphasis on details and accuracy, and order to do that properly, drawings as accurate as possible will have to be made. The first set of elevations have already been drafted, with more to come. 


Once they looked fine to me, they were reprinted and pasted onto card with spray adhesive for mock-ups to give me a better idea of how they'll look. 


So far, that's only half the town! 

October 2011 Update: Back to the Living Desert

EDIT 10/21: I've added to this post since it was initially published; scroll down to see more!

On the eve of the layout's 6th anniversary on Sept. 25, I thought it was time to get something done. While Bear Country and the other forest sections are progressing on the west side of the layout, over in the opposite corner, the geothermic area of the Living Desert has been on hold for some time.

This area was spruced up and rebuilt after the Big Redo of Winter '09 when the whole desert was elevated to accommodate the underpass to the caverns.

Since then, ideas of having animation, spurred after adding movement to Balancing Rock Canyon, to the geysers was always something in the back of my head.


For some time, the acrylic rod and spider-web material looked pretty good, the only thing that it was missing was movement. In February of 2010, I figured out a way to make air powered geysers that worked by means of a pneumatic actuator.
"I was initially thing of using a screw type with a motor and bolt, but I later figured out a way to do it with pneumatics. I started playing around with a few short lengths of small brass tubing and an aquarium air pump (the ones that are about 2-3 psi) to my surprise, it actually works quite well, more than enough power to push up a rod of plastic (I might even be able to power all the geysers off of the same pump).
I built a prototype and I've been playing around with it, adjusting the amount of air pressure, location of overflow holes, and a bunch of other things. Basically, with my brass tube pneumatic actuator, when the air pump is turned on, the column rises, when power is off, column falls. I can control the amount of air pressure by using a dimmer switch on the air pump (a 3-way gang with adjustable valves is probably ideal). Since it's all aquarium equipment, it's virtually silent, aside from the very slight rumble of the air pump. The next thing to figure out is making the column fluctuate and vary in height, probably with a valve on a cam."

While the prototype worked at my work table, the main issue was the size of the mechanics involved; in order to have the acrylic rod fully retract and have the actuator, the overall unit would have to protrude down several inches-- almost a foot if I recall-- into the table below (and my 20,000 Leagues Project, namely the squid fight scene).

Another issue with that prototype was the idea that the whole layout would become portable and break into two parts, thus scrapping that plan.

I went back to ultrasonic misters for my next idea. This one seemed promising due to the fact that it didn't go beyond the dimensions of the table, namely through the bottom. A few days of tonsillitis revealed my next idea-- an ultrasonic humidifier.
"A few months ago I had a really bad sore throat (Tonsillitis!) and went over to Target to get a new humidifier to help alleviate it. I got one, and as it turns out, it's an ultrasonic one ( unlike the fan and filter ones I've been use to). Since it was suggested, I've been trying figure out how to get an ultrasonic mister to work for a geyser for the layout, through the use of containers, piping, and fans; it would have been trial and error to get it as efficient as possible. Enter the humidifier: it had exactly what I needed; an ultrasonic mister that outputted adjustable mist, but kept water contained-- all done efficiently and with a stylish look!


Rather than lay down and rest my throat, I immediately started pulling out pieces of PVC piping and other bits of assorted tubing to test the limits of this humidifier. I was very surprised with the amount of power it had and the volume output of the mist (it's not really mist, more of fine vapor, like steam). I plugged a length of PVC with four holes to represent geysers, and even through it wasn't at full blast, each "geyser" was putting out a good amount to be called a geyser."


Fast forward to a few days ago (now that I don't have tonsillitis!) I began playing with it again, and this time tried it with 1/4" tubing on the last leg after the mist leaves the 1 1/4" PVC before it actually goes to the geyser. I wasn't expecting much to come out since the 1/4" tubing is pretty much too small, let alone over a foot of it--but, to my surprise, a good size column came out! Again, this wasn't even at full power and I still got a good effect, doesn't really need to get any taller IMO. But, the 1/4" tubing has it's problems-- condensed vapor drops obstruct the tube easily after running less than a minute. No problem, just need a larger, shorter tube, and have it positioned so gravity does the work in getting condensed water out.

The humidifier did look really good in the video, but as I studied it more, the effect was something hard to look at without the proper lighting all the time. What the moisture would do to the scenery besides attracting more silverfish, concerned me slightly, and visually, this solution did really do it and it was scrapped.

Earlier that same year, the Devil's Paint Pots were also looked at for potential kinetic energy. Digging right into the scenery, I started experimenting:
"I've also been looking at making the Bubbling Mud pots actually bubble. The basic premise here is to make tube full of water, and adding an air line to make it bubble like an aquarium. I built a few prototypes right in the scene, and so far, things haven't been that successful. Since I'm using 1/4" tubing, the water tends to get sucked out of PVC pipe mud pot when the air pump is shut off, and controlling the amount of air flow to get the right bubble interval isn't easy. Plus, in some tests, I found that the bubbles weren't popping easily (maybe the painty water that I used did that). I'm still working it out, and this element might need to end up being static."


 At the same time, I tried to get more "authentic" with the faux turnout at the "mine tunnel". In theory all I had to do was splice in an Atlas turnout and it would look a lot better than what I had before. In the end, all it did was roughen up the curve and kink it out of shape. The turnout is also too wide and shouldn't have been put in at all in the first place. My mistake. After that failure, this corner of the layout sat untouched while the rest of the layout expanded with progress, abandoned with unfinished ideas and effects that didn't work.


Fast forward to a month ago. A trip to Lowe's reignited my interest in geyser animation with their fog machine. While I did already have a fog machine, what intrigued me with this one was it's dimensions; if I wanted to use it for the geysers like the ultrasonic mister, it can fit perfectly below the surface of the scenery, without protruding through the table the layout is sitting on (remember, the layout has to be portable ). I bought the fog machine and began experimenting. Despite it's ideal size, the results from the fog machine were hard to achieve because in order to have the fog come out that tiny hole at the geyser, the container that the fog and machine would be in would have to be perfectly sealed-- which doesn't help when the machine needs to breathe with all the heat it generates. This fog machine also produced an oily film from the fog, despite using water-based fluid, which was something I didn't want to deal with when it comes to maintenance. So, while it excited me at first, like the ideas before, this one was scrapped.

While trying to brainstorm various ways to get geysers to materialize, one idea kept appearing-- or more appropriately, reappearing-- the acrylic rod. The very first geysers always looked the best visually, it was just getting them to move that was the tricky part. After numerous sketches, I found one that looked very promising and ended up being the simplest one.

As in the video below, the acrylic rod is contained in a styrene tube while in the down position. When the geyser "erupts", a thread pulls the acrylic rod up from it's base. The water column-- with an appearance like the Enchanted Tiki Room's "Enchanted Fountain" at this point-- drops when slack is given in the thread.


A few coats of Mod Podge gave the rod a more organic look. At night, a bright white LED illuminates the water column from below. Cool!


It's not quite as "airy" as the first static ones, but I think the motion of them bursting out of the ground will make up for that. 

EDIT: 10/21

While looking over reference shots of the geysers, I noticed that three of the four spewed quite a column of water. The fourth, however, was a little different. This one had more of a "spray" appearance, and was not as "persistent" as the other ones. It was on most of the time, while the others varied in hight and this one stayed constantly at the same height.

When designing the mechanism to control the geysers, I thought this smaller "spray" geyser could use a different approach, since it had a different appearance and performance. While I could use a little fluff material to represent it, a little movement would help it fit in with the other geysers, which are bobbing and fluctuating. So far I've come up with a very thin rod, wrapped in spider-web material (which is very abundant this time of year). The rod is on a motor, which spins at a fairly moderate speed. Haven't decided on whether to use it or not, but it looks pretty neat.


Meanwhile, still on my experimenting kick, I took a look at the mud pots. After the mess with bubbling painty water, I took a different route and instead of actually using liquid, I decided to simulate it. Using a piece of rubber from a dishwashing glove, I cut out a disk and glued it right onto the original prototype and gave it a coat of paint and mod podge.


In the test footage, it looks pretty good, so I proceeded to build the mechanics to do this. 

With all the things being thought of and requiring a substantial amount of overhaul work, the only time to really get them done was at the same time. So when I was ready to install the geysers, mud pots, and a new stretch of track, I ripped up what was there leaving a gaping hole. Doing everything now reduces the amount of stuff I need to replace or rebuild (which I'm sick and tired of doing). 


Above left is the hole cut into the scenery and entire chunk removed. That chunk was on a piece of particle board which made any renovations such as this one difficult. A jigsaw changed that. At right is the new piece of flex-track, perfectly smooth with no kinks or bumps like the mish-mashed track before it. 

On to the mud pots, I had to figure out the position of each colorful bowl mainly so I could determine the mechanics orientation, but also so I could be accurate to the real thing. In the past, I simply made up a composition of the Devil's Paint Pots, a sort of random pattern. This time around, I actually studied the real ones from numerous photos and drew up a map of the cluster. This map made it easier to determine which mud pots I would animate and which ones would leave static. 


The actual mechanism would consist of my usual cam and lever operation. Basically, the cam would slowly push down on a lever, raising a rod to push up on the bottom of the rubber disk-- giving the illusion that a "bubble" is rising to the surface. A notch in the cam would release the lever, dropping the rod, creating the illusion that the bubble "popped". Below is the mechanism in action, before the "surface" was put on top.


When the mechanism was finished, I cut a piece of masonite for the ground surface and the mud pots themselves. The ones that would actually be working have a piece of PVC pipe to support the rubber disk. After cutting the actuating rod to the proper height, I glued down the rubber disk.

After doing three of these, seen below (two of them have a test coat of red paint), I let the mechanism run for a while to break-in. However, even after a few hours and few tweaks, the overall effect just wasn't that satisfying, after many adjustments; every time a bubble "popped" if made a loud clack noise, which is the sound of lever dropping. The sound can be dampened with a piece of foam, however at the cost of having the visual illusion diminished. After sound dampening the three I had, the minimal movement of the mud pot bubbles made this little project  seem unnecessary; was it really worth it to have these barley noticeable tiny "bubbles" that raise no more than a 1/16th of an inch?


Not really, at least at this point. I've changed gear and I'm working on the geysers. Maybe if I find yet another solution, I might try. For now, Devil's Paint pots project is shelved. Who knows, I might go with what I predicted when I did the first prototype-- might make them static and just look good.