"Howdy Folks! Welcome to the little mining town of Rainbow Ridge, the gateway to Nature's Wonderland"

This is my documentation of my miniature re-creation of the long-gone Disneyland attraction: Mine Train Thru Nature's Wonderland. This is a selectively compressed model railroad, in On30 scale at 5' X 7.5' that has been in progress since September 2005. In May of 2016, I finally got the layout to a point where I declared it "finished".

I started the layout when I was a sophomore in high school with basic skills and over the years the layout has been improved and reworked in drastic ways to match my ever improving model making skills. In fact, since I started rebuilding the sections to better quality and standards, I've actually created a whole new layout, piece by piece.

This is a stand-by basis project without a deadline, so it tends to hit the back-burner a lot due to other things with higher priorities. But whenever I can, I'll give an update when there is something worth talking about. All of my updates since day one are here, which include photos, videos, and plenty of rambling notes and descriptions.


April 2010 Update: Rebuilding Cascade Peak

A lot of activity going on in the Nature's Wonderland area, specifically the west half of it, the nearly forgotten half. Cascade Peak is currently undergoing it's long overdue rebuild which will bring more detail and accuracy to the mountain and will look more on par with everything else that has or will be redone in terms of quality.

I should mention that in the sidebar I post what my "current focus"is; I update that more frequently than post, so watch that even if you don't see any recent postings. The date indicated the last it was updated.

 I layed down the track all the way to Cascade Peak, which is a major step to do, which includes all of the track for Rainbow Ridge with it's onstage spur line. As mentioned in previous posts, all the trackage going is being wired for two train operations, so the mainline is separated into blocks and the station has some areas where I can turn parts on and off if I want to only run one train.


This area was tricky to do, since the track had to reach the plywood on a grade, so I came up with my own way of laying track that can be adjustable. The next step would be to fill in the areas underneath with probably celluclay or sculptamold.

Here's an overview of the model which shows what the layout looks like at this point, Cascade Peak is getting it's major rebuild, which will be the main subject of this update.


A very colorful version labels everything, and it's quite obvious how packed in everything is and where areas are located. 


Now, onto Cascade Peak....

For several months, if not years, the Cascade Peak on my layout has been slowly falling apart and needing a major rebuild. My sculpting skills, especially when it comes to rockwork, have greatly improved, and I thought it was time to bring the quality up on the mountain. There are also a number of inaccuracies I discovered on my model, even after redoing my mountain three years ago.

Before I did any work at all, I made sure I documented what I had (would be neat to do a before and after shots when the rebuild is complete).
The old Cascade Peak model, soon to be redone.


This corner is perhaps the most neglected area on the entire layout, totally falling apart here. This is area is so forgotten, I didn't even add the waterfalls to this side when I redid the entire peak! The hill connected to the mountain didn't get very far either.

Perhaps the most neglected part of the layout, this side of Cascade Peak was never "finished" since it's a hard to reach area, as well as hard to see.

In planning the new Cascade Peak, as I did with Rainbow Ridge,  I went to aerial imagery and plot plans to see if I can get a full scaled out Cascade peak-- so proportions and details would be accurate. Unfortunately, as always, I found my space is too small; The mountain needs to be about a foot longer and about 3 feet deeper. I've got a foot to make it wider, but then the track radius gets hard to determine and tighter ; and I have only 17 inches for the depth, in an already squashed Bear country. So I guess I need to compromise yet again!

The track around Cascade Peak has always bothered me, as the appearance is terrible (as it was ballasted prematurely) and the curves are really tight at the ends. Also when I did the layout, I didn't feel like detailing the track with "bridge work" as with the real thing:
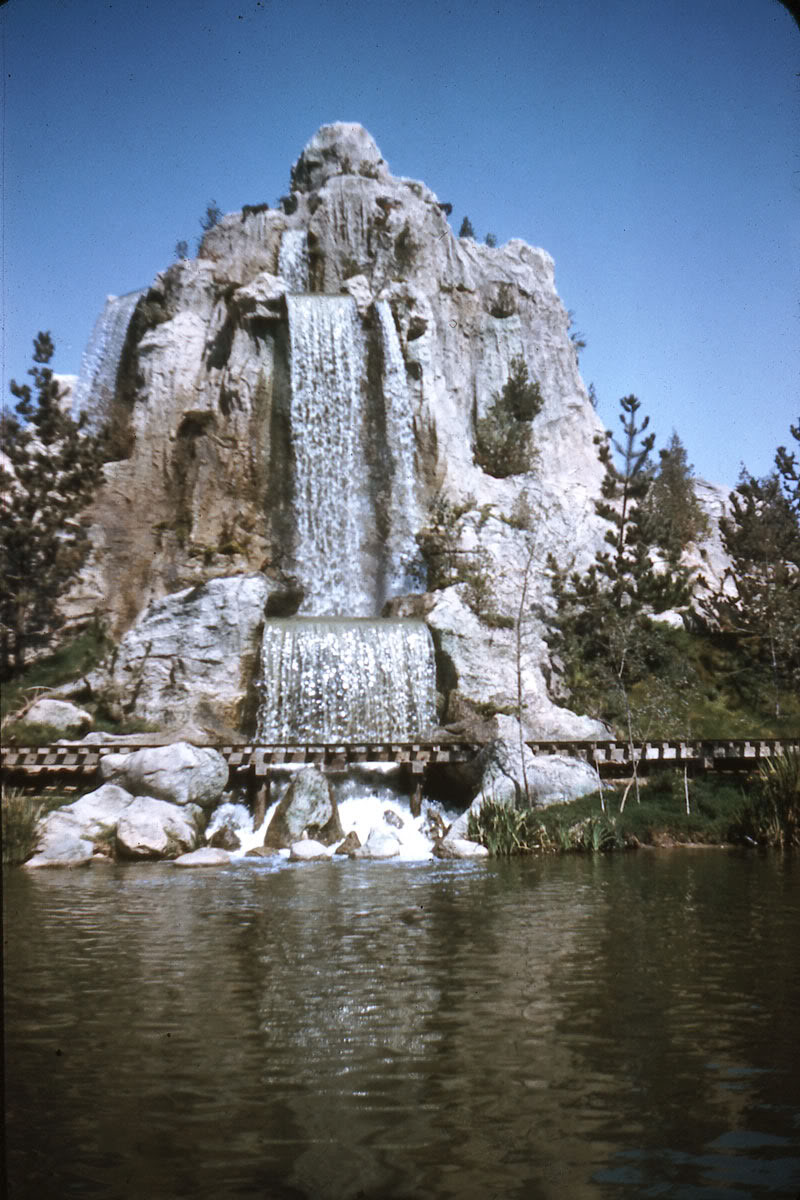
The real Cascade Peak, with a track detail I didn't bother to add when I originally laid the track down--the "bridge truss" the track is on as it circles the peak. Photo credit goes to gorillasdontblog.blogspot.com


I decided to go for the bold move and expand the track out a few inches, to ease the curves at the corners and make them less tight as well as add this extra bridge-like details to the track. 

I dug out some old snap track that was in good condition, and I roughly laid out where the pieces would go. I'm using 15", 18", and 22" radius pieces, as well as a piece of flex track for the last turn and the new Bear Country trestle. The advantage with using snap track is that they keep their radius, which is easier to work with than trying to wrestle a piece of flex track into the right position and keeping it there. 


The new sections of track roughly held together in place so I could determine the smoothest curve and widest radius.


As you can see above, sections of the mountain, including Big Thunder falls, have been  already ripped out for this new track. The many advantages for putting in this new section of track is to make the curves less tight, add more authentic track ("bridge look") and the extra space between the track and the mountain will give more room for the waterfalls, which have been pretty pressed up against the mountain. 

Once I was happy with the track, I begin installing it in permanently. I made the truss-work out of styrene square rod and a few pieces out of balsa wood. Since the track here was already at the correct grade (you know how I'm so fussy with the grades) I simply transferred the height measurements over to the new track. 

The new track has been installed permanently, with the truss work and all.  Sections of the old track are still visible, and will be ripped out when it comes time for the new scenery and waterfalls. 

At this point, after several months of having the main line cut up and sections isolated (since I had redone Rainbow Ridge and such) I'm proud to say that a full and complete line is now operational, and I can have a train run on it's own confidently. The full loop is back!

Once the track looked pretty good, and the train ran fine over it, I was ready to tackle the mountain itself. 

The mountain was a difficult thing to figure out how to rebuild. I was stuck between retrofitting the existing structure (just add on to it) or starting completely over which would makes things a little easier, in terms of strength and building. After much thought, I eventually settled on just retrofitting the existing mountain. 

Foam, which do I use.... (and how do I get it?)

For materials, I didn't want to go back to using paper mache as I did with the original mountain. I wanted to work with a material that can carve easily, without using a lot of expensive urethane foam. After reading several Model Railroader magazines, I thought I'd give a shot at using the foam insulation board they always use; it's very cheap for the amount of it you get, and it carves and shapes fairly easily. Problem is that it turns out almost the entire southern California area hardware stores don't carry the foam, and so I'm stuck having to not use it. Avoiding having to do a special order, I ended up snooping around the garage for supplies, just in case I found something that might work.

 I came across some foam that Lowes did have-- the white beady styrofoam sheet-- which I had plenty left over from a Physics class project years ago (we had to build a device that could help you could walk on water--which I failed at; I floated, but a rudder would have helped). I was hesitant using the styrofoam at first since it doesn't give the same quality carving as with urethane foam, but realizing I could get a good texture and strength out of it by covering it with celluclay, I thought it would actually work. I made a few test pieces and after a few days of dry time, I ended up with a satisfactory substitution for insulation board. Although it takes more time, at least I can use up scrap material I already had (styrofoam and celluclay). 

The first thing I did was use the styrofoam to form the new hills for Bear Country. I stacked a few layers and glued them together with white glue. When it dried, I carved a rough form, which will be later covered in Celluclay for a rock hard finish. 

The new land formations for Bear Country and Cascade Peak are being made out of styrofoam. This will be covered in celluclay which is will make a nice solid surface for the future foliage.


I'm also taking the advantage of the new expansion space that appeared when the layout made it's second move to a bigger table last year. I'm expanding the hills into this area, to give more natural space for the mule trail. Here's what the expansion space looks like, the extra six inches:
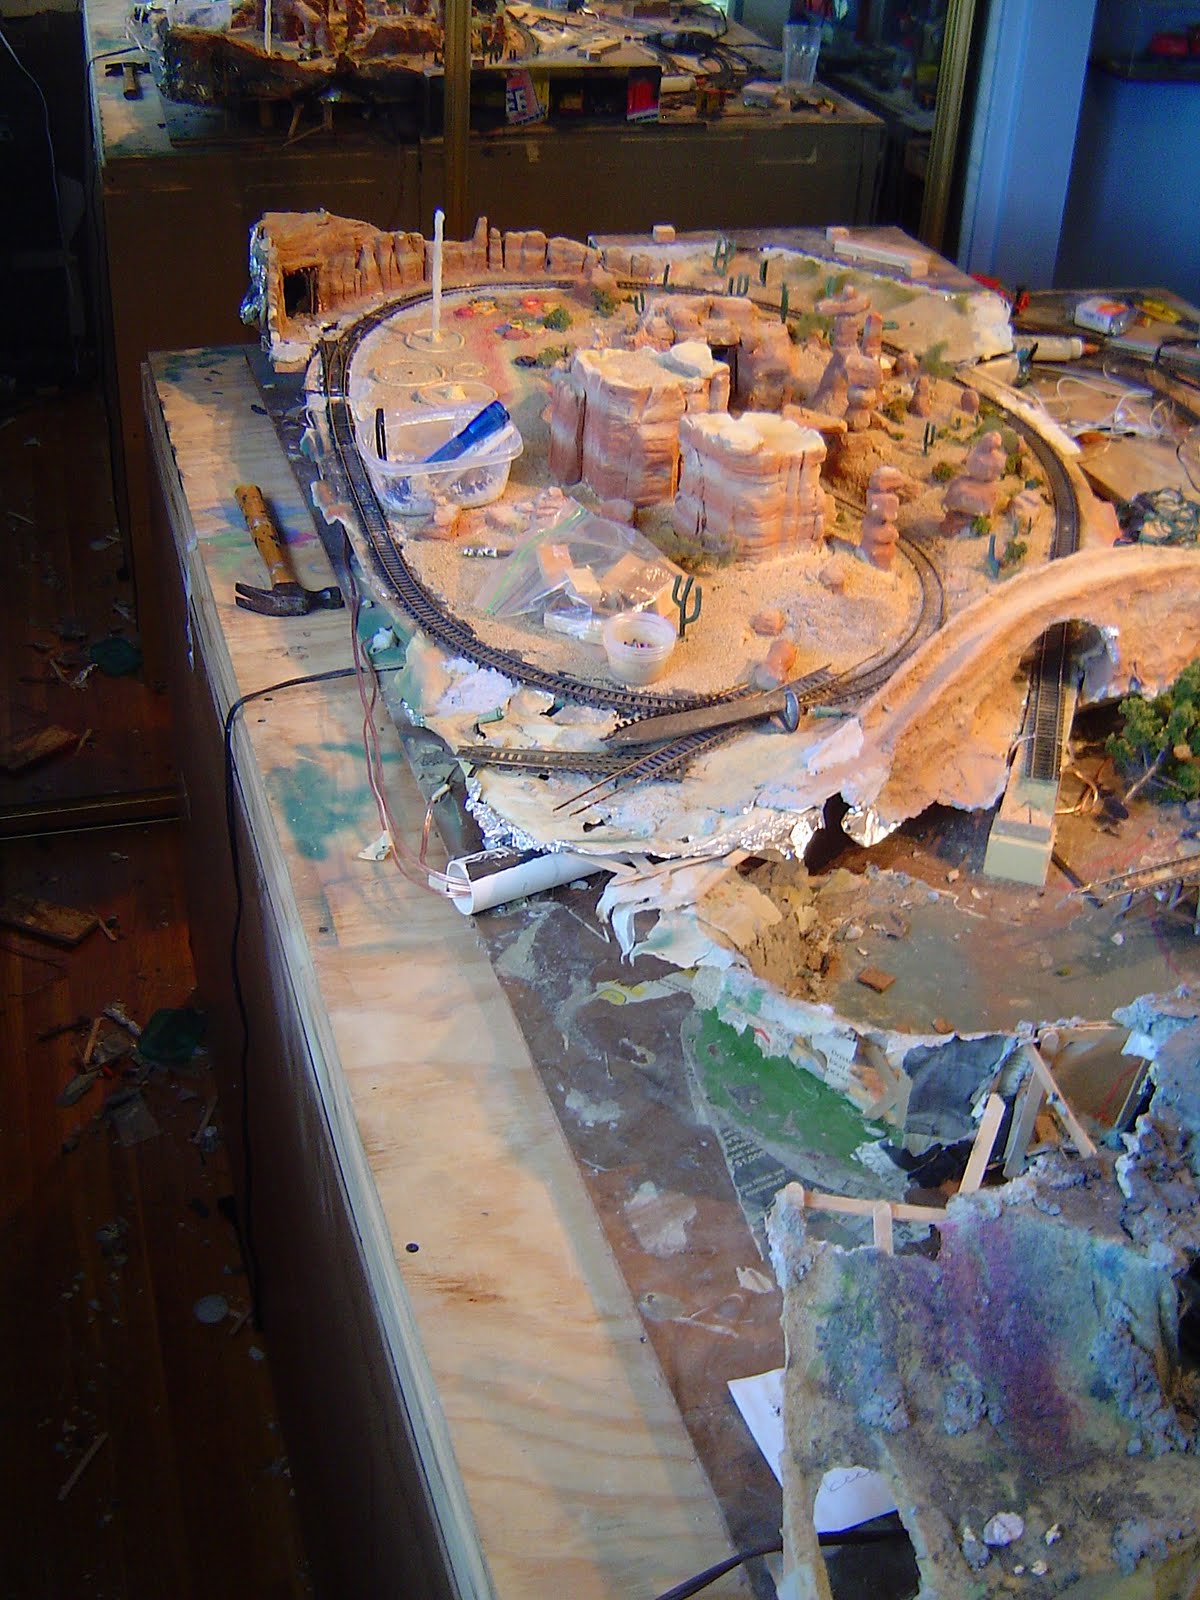


The 6" of plywood seen in the picture is the expansion space that was created when the layout made it's move to a larger  table. This space is being used for the hills of Bear Country and I'm considering expansing the Desert area into it too. That, however, willeliminate my plans for adding a static Disneyland Railroad. 


I'm also seriously considering expanding out the desert a bit into this 6 inch space, to give the geothermal areas a little more room. That would however eliminate my plan to add a non-working stretch of the Disneyland Railroad line, so I'll need some time to think about it. Should I expand the desert in the future, I have to have a solution for working geysers, as that would be the best time to install them. 


Waterfalls and other features are blocked out in styrofoam. The original track that circled the mountain has now been ripped out at this point to make room for the coming scenery. 


Since they are the most prominent features on the mountain, I blocked out the water falls with styrofoam blocks. Aside from a few adjustments in there position a few inches, the waterfalls are pretty much in the same spots as they had been. I really wanted to move them where they should be in terms of the distances between them, but there was only so much I could do on this already compromised Cascade Peak and making it look good at the same time. At this time, the remaining pieces of the old track were ripped out. 

When I was done with positioning, floral foam came next to block out and shape more details. "Why floral foam?" you say. Well, since this is a retrofit project, I need to be able to shape blocks of foam fairly easily by rubbing it against an existing surface to make a custom fit. Since floral foam is less dense then the usual urethane foam I use, it shapes very easily, yet it allows for intricate details almost like the urethane foam. And the price of floral foam is fantastic too; I bought 12 brick size blocks of it for about $8--not bad!

Once the foam, of both kinds, were shaped to the way that I wanted, I covered and blended many of the unwanted cracks and seams with celluclay. Celluclay is a paper mache type material that you mix with water and will get hard a in few days (or even a whole week, depending on how much water you put in). Recently I had switched to Sculptamold, which has a little plaster in it and sets and dries much faster, but I didn't want to use it on this portion of the project; I usually mix the stuff in big batches and so I want to be able to cover a large area and shape it the was I want it without it setting on me too quickly. Celluclay will stiffen in about 24-48 hours and then a few more days to dry completely, so this seemed like a good way to go, as I want to pick at details as I look at every now and then. The Celluclay also has a neat texture quality to it that makes it appropriate for Cascade Peak, a kind of early Disney rock formation made out of cement look. 

After the styrofoam was in the right position, floral foam was used to make more details and just about all the seams and cracks were blended and smoothed out with Celluclay. In a few days, the celluclay will create a very hard surface, 

The above photo show the "Twin Sister Falls" given a first pass of Celluclay once the floral foam was done being sculpted (I never understood why those falls were called :Twin Sister falls", since they in no way look alike).  The next step after this photo is to move around to the backside of Cascade Peak overlooking Bear Country, as well as the the hillside on the left (the styrofoam). As I worked on the mountain, I would slowly rip out old sections and replace them, so a lot of the mountain is brand new, with a little bit of the old material still part of the structure. 


Above, more foam and celluclay have been added and the backside of the mountain will be next. 


Here's the Bear Country and Beaver Valley areas, dominated by the currently peak-less Cascade Peak. Since photos of the backside of the mountain are quite rare (and when I do find one, the quality isn't great) and there are a lot of compromises already, I basically took some artistic license and made up what  looks good to my eye. Same with the rest of the Bear Country and Beaver Valley; unfortunately, there is not enough room to make an accurate depiction of the land forms of those areas, like rivers and such, so I had to change sizes of the land plots and the widths of the main rivers in order to get everything to fit. Even the Bear Country "island" where all the bears hung out was cut to half the size it should be in order to fit. 


The backside of Cascade Peak covered (mostly) with fresh celluclay. The mule trail is visible as it snakes along the backside of the mountain. Also visible is the tunnel portal to Bear Country, with it's truss-less trestle. This tunnel actually still visible today at Disneyland. 


Here's the Big Thunder falls roughly shaped to form with styrofoam and floral foam. Large gaps are covered with aluminum foil. I didn't realize how many little falls Big Thunder falls had when I looked closely at photos. Unfortunately, this area got pretty squashed and compromised to fit the space, but it looks pretty good and natural.


When I was happy with the shape of the material(s), everything got a layer of celluclay.


Once this hardens in a few days (other areas may take a week) I'll be ready for the next phase which is more details and other areas I missed with the celluclay. The celluclay will create a nice rock solid surface for more formations and details.  The peak will cap off the rebuild (no pun intended) and then everything should get a coat of paint to seal everything. 


March 2010 Update

Being that it's been a over a month since the last update, I thought I give a very quick one (with no pictures) just show that I haven't disappeared.

Unfortunately, the layout has been halted a number of times due to the college work load and other projects that have priorities (with more on the way). So the layout has sat untouched collecting dust.

After finishing a big concept model that I've been wanting to get done for a long time I'm finally getting back to the layout and getting some stuff done. I'm going really slowly now, as I want to get things done properly and not make any mistakes that I would have to fix again. Although I was planning on doing track work for Cascade Peak, and giving it it's major rebuild, I decided to change gears and get the Rainbow Ridge track installed. This included determining the grade and the tilt for the plywood base for the entire town (the tilt actually hardly noticeable, which is great) and locking it down. Track was tacked down for the load area, which includes the main line and turnouts with a spur line. All wiring for the area was done, so this was a big step to do.

The next thing I'll probably work on is checking the track around Cascade Peak, to make sure it's the right grade level and if I need to make any adjustments or replacements. At this time, Cascade Peak will go under the knife where I'll add and replace more details that will make it more accurate and interesting. Then I'll move into Bear Country which is taking a lot of time to plan out. I haven't determined how I'm going to do animated jumping fish, so I'm leaving them out at the moment, but not out of mind; I could add them in later, so I'm planning on making some removable areas so it's not a big rebuild when I decided to put them in. Same with the Battling Elk, planning them out, but not putting in the animation just yet (I might even have one motor power all the bears, fish and elk, so that will take a lot of careful planning.

Speaking of Bear Country, one of the aspects that has been bothering me is the water. For years I've been using a gloss medium called "Mod Podge" for my water and typically I'll build it up in layers until I get a nice depth effect. Well, that isn't such a good idea, I've been leaving objects on this "water" and they create an imprint that is almost permanent. And when the dust settles on this, it's almost impossible to clean. I've decided to look at other options. In the back of the Desert, I made a pond that is shaped like any other real pond, with a recessed area. Then I took a piece of clear plastic to represent the water surface and laid it over the bottom of the pond. On top of that, I brushed on a thin layer of Mod Podge, and the end result is a very realistic pond which has depth, and since the Mod Podge is thin, it's less susceptible to imprints and dust.

I'm planning on using this technique for Bear Country lake and the Beaver Valley creek. The depth will only be an 1/8", but if I only seal the plastic around the edge, that makes it much easier to take it out and add the jumping fish if I figure that out (again, planning ahead). So once Cascade Peak is done, that's where I'll go.

Although the layout is far from finished and progress is slow, progress is progress.

February 2010 Update

With almost a month of school under my belt, I can get a more accurate feel for how work is going to progress on the layout. I might be able to squeeze an hour or two a night during the week, but mainly I'm only able to work on the layout during the weekends. I've also got some other side projects coming up on the horizon soon, so the layout will be hitting the back burner a lot.

This whole effort to retrofit the layout and make all these big changes makes the project a complicated puzzle.  So in addition to having to take the time to put in more details than I did in earlier years, planning how everything will come together is taking some time if I want everything done perfectly without having to go back and fix it again. Since some area have to wait until that area is done, but that area needs this aspect, but that aspect needs to be worked in for future additions, it becomes a big domino effect that I need to coordinate properly. So even if there isn't much going on physically, there is a lot going on (at least in my head!).

At this point, I've adjusted my work schedule for the layout. Right now I'm going for a "generally finished" layout for an upcoming Patrick Hurd podcast. That means the most of the areas on the layout will hopefully have most of their major details and will look basically "finished" . I would like to get this "generally finished" look by about mid-March, but even that is a stretch; there's simply too much to do being that I'm a perfectionist these days and the amount of planning it takes to bring all these elements to the new layout together. By March, I might be able to have Rainbow Caverns done,  Cascade Peak redo done, Bear Country roughly blocked in, and I just barely might have the cardstock mock-up buildings for Rainbow Ridge (Rainbow Ridge has about twice the amount of buildings, and I only want to build them once!). We'll see, things could change.

My plan of attack for the layout is to get the track for Rainbow Caverns and the Living Desert done (which includes adjusting the track for the uniform grade I discussed in a previous post). From there I'll hop over to the opposite side of the layout and work on adjusting the grade for around Cascade Peak and Bear Country. There I'm also going to give Bear Country a new trestle and plan out that area for development (and also figure out if I'm going to put in jumping fish) and Cascade Peak will get a major facelift with more details and new water falls. Once the two ends are pretty much done, the track ends will join together at Rainbow Ridge were the big construction job will happen with all the buildings I'm going to make (but starting out with cardstock mock-ups to figure sizes out). If everything goes well, I just might have every detail in by the very end of 2010 or early 2011 but I can't count on that. With this project, I don't want to rush it with a deadline, I want to actually enjoy working on it despite how repetitious and tedious some areas are. It's too bad I can't get it done before the real attractions turns 50 in may, but hey, that's just how it's going to be if I want a cool looking layout!

Since the layout had changed so much in the last couple of months, I decided to film another "aerial" video explaining what's going on.

To see the annotations that I put on the video, go to the video on YouTube here

As for what has been done within the last month, the Living Desert is shaping up very nicely and I think I'm in the home stretch for this area in case of making it look "generally finished". I'm proud to say that Balancing Rock  Canyon is finally finished after doing heavy work on it and also having to fix the mechanism a few months prior. This section was crucial to get finished, considering it would have been a lot harder to work on if the areas around it would have been developed more.


Going back in time a little bit, in the last update, this area just got it layer of scultamold and it was ready for paint and scenery. From here more foam rocks were added and everything was painted. 


As I was adding these rocks, I decided that I'm going to branch off a little bit of the accuracy side and more towards what looks good. A lot of the rocks that were added were basically made up and don't correspond to anything in the original attraction. I just went for what looks good, proportional, interesting and didn't worry too much if it looks like something that the attraction had. With this in mind, my rocks actually look more realistic and less "blocky" or "edgy" like my earlier rocks when I was more tight and constrained in sculpting the rocks when trying to be accurate. 


From here, I'll let the time lapse demonstrate adding the details to a portion of the desert:
Unlike previous time lapse videos that I've done, I didn't do captions.


I must say, the Desert area is looking very beautiful, and it's great to do detailing instead of redoing the same thing again!

Here are a couple of shots of the train in the scene as well as a neat POV shot. 


Although not pictured, the pond in the back of the desert is finished and that area should see more detail soon. (Don't know when I going to do the Dinosaur bones though!)

Meanwhile in the geothermal area of the desert, I think I've finally come up with a solution to simulate those geysers. 

After considering using ultrasonic misters for some time now, I think I'm going back to my original idea of having a static column of "water" that raises up and done on an actuator. The thought of a whimpy mist and the potential for a mess kinda shelved that solution for now.

I was initially thing of using a screw type with a motor and bolt, but I later figured out a way to do it with pneumatics. I started playing around with a few short lengths of small brass tubing and an aquarium air pump (the ones that are about 2-3 psi) to my surprise, it actually works quite well, more than enough power to push up a rod of plastic (I might even be able to power all the geysers off of the same pump).

I built a prototype and I've been playing around with it, adjusting the amount of air pressure, location of overflow holes, and a bunch of other things. Basically, with my brass tube pneumatic actuator, when the air pump is turned on, the column rises, when power is off, column falls. I can control the amount of air pressure by using a dimmer switch on the air pump (a 3-way gang with adjustable valves is probably ideal). Since it's all aquarium equipment, it's virtually silent, aside from the very slight rumble of the air pump. The next thing to figure out is making the column fluctuate and vary in height, probably with a valve on a cam.

I've also been looking at making the Bubbling Mud pots actually bubble. The basic premise here is to make tube full of  water, and adding an air line to make it bubble like an aquarium. I built a few prototypes right in the scene, and so far, things haven't been that successful. Since I'm using 1/4" tubing, the water tends to get sucked out of PVC pipe mud pot when the air pump is shut off, and controlling the amount of air flow to get the right bubble interval isn't easy. Plus, in some tests, I found that the bubbles weren't popping easily (maybe the painty water that I used did that). I'm still working it out, and this element might need to end up being static.


Since both the Geysers and Mud pots have materialized in some way, I'll be holding off on improvements for now until I get other area up to par for a "generally finished" look. 

Meanwhile, just next to the Living Desert, Rainbow Caverns is progressing very slowly. At this point, the new Rainbow Caverns has just become a chore since this is the 4th time I've had rebuild it. I'm tired of it and I'd really like to move onto something else, but I've got to do it! 

Since the new town of Rainbow Ridge ate up some of the land for Rainbow Caverns, the entire caverns had to be reworked to fit in a more compact space. I moved the viewing window to the side of the layout and I was able to squeeze a new "show building" like structure into that small plot. 

Here's what the area looked before the new structure to house the caverns went in and the new "show building" made of old sintra signs.


 This "show building" I paid a little more attention to in the overall architecture of it. I made it shorter in height to put it in scale more, and also so it can hide behind  that hill in he desert. The angles of the roof also are very similar to that of the show building for the original Rainbow Caverns structure. Once again, the roofs are made removable so I can access and build the inside the caverns. That small tunnel will lead to Rainbow Ridge and it will be hidden with foliage like the original attraction


For now, wood blocks serve as handles for the access hatches, though eventually they will be made to look like AC units.

Inside the "show building" work is going ahead on the rock formations made out of sculptamold. I decided to not shoot construction with time lapse as it is a smaller work space and I just wanted to get the caverns done and not fuss around with filming it. Using the same notion of making things look good and not being to worried with accuracy, I'm just making up how the caverns are looking considering how compromised the space is. I'm going for a Geyser Grotto feel with a pond of geysers and the Rainbow falls as the end. This time around I'm actually using UV LED's instead of a small fluorescent blacklight. This way I can light everything precisely without worrying about changing the batteries for the blacklight bulb or the bulb "burning out". Plus, the deep purple light the LED's give off looks really cool (though, unfortunately, impossible to photograph accurately).


I've also come up with a way to lay track efficiently. Since I've got that grade issue, coming up with a way to lay track wasn't easy since it had to raise at a specific height every few increments. I came up with a pretty genius way (at least I think it's genius!) of laying track precisely. By gluing a strip of pre-drilled countersunk masonite to the track at specific increments, all I have to do to make a grade and install the track is to add spacers between the strip and the actual base of the layout. This way I can precisely control the grade, but all since I'm screwing the track, I can torque the track the way I want it and be able get the joints nice and smooth, as well as be able to make adjustments easier. Here's a close up of the strip screwed down with one layer of spacers. 

 
This is only for the Rainbow Caverns portion, until the track hit the plywood base for Rainbow Ridge.

Speaking of grades, the section of track for the Living Desert that leads to Crossover point (see previous post) is locked down permanently.

January 2010 Update

Since the Nature's Wonderland project is the only project I have in the new year, I hoping to get more progress on it before I get distracted by something else or when College gets in the way. I've been doing a lot of planning for newer areas to come as well as fixing and sprucing up existing areas so this will be a lengthy update.

First up, Rainbow Ridge. This area was recently cleaned out and I started figuring out my complicated grade I need to incorporate into the new trackage as explained in my last post. I'm almost ready to lay track, but Model Railroader mentioned that their next issue will feature an article on laying track (more specifically, HO flex-track) which I'm very curious to see. So I'm holding off on any track laying until then. In the meantime, I've still got more planning to do in that area, and if I want to make any changes, I better do them now because I am not going back to fix any mistakes (again!).

In the planning of Rainbow Ridge, the goal is to get the entire town on the layout and also be able to fit some other areas nearby like the Pack Mule load area and Mineral Hall--if possible. I wanted the layout of everything to be as accurate as possible, so I turned to "satellite imaging".


I photographed overhead the area where I will be working on so I can draw all over it and make drawings that will aid me in the process. From here, I took an aerial photo from the real attraction and overlayed it on my model photo to figure out the position of everything.

I distorted, moved, changed, and tweaked the photo until everything fit on the layout table. The outcome is quite exciting because of all the new things that will be added to the layout. In this expansion I will be able to add an entire Rainbow Ridge town (the one for the mine train load area), almost everything for the Pack Mules (a few buildings will need to be cut), the entire load area for both attractions (barely), Mineral Hall, and to my surprise, part of the Casa de Fritos building with it's outdoor seating area! Before I decided to expand, I only had room for just half of the Rainbow Ridge buildings and nothing else!

The photo below shows the superimposed image over the photo above which shows everything that will be added to the layout as part of this expansion. The green lines represent the track for the model which dictated the layout of everything, and the yellow lines represent the proposed Pack Mule trail.


But before I can get started on the construction of that area, I need to do more planning like making drawings of all the buildings. But I also need to get some other areas finished before, like Balancing Rock Canyon, because once the new Rainbow Ridge goes up, that area will be a lot harder to work on!

Balancing Rock Canyon is located in the middle of the layout, which makes it difficult to work on with everything around it, especially when the new Rainbow Ridge gets constructed. Lately I've been working on getting this area fixed up since I tore it up to fix the gears and I would like to finish it all the way, right down to the ballast on the track (which is something that I usually tend to save for last).

The track in this area has been getting special attention, as up until recently, I didn't really pay attention to the appearance of it. When I originally started the layout, a year or two after I initially layed the track, I ballasted the track with real dirt and the scenery started to grow over the ties, leaving the track looking like a dirt covered area with some rails stuck in it. Today, now that I pay much closer attention to detail, the track is getting a lot of cosmetic care like cleaning the ties up to make them more visible. Unfortunately, the track sits a little lower than the scenery (on the real attraction, and on real railroads, the track typically sits on ballast a little higher than the rest of the surrounding area) and there's really no way to fix it without redoing the track (which is an option that I am not considering). So, I've been extra careful keeping the scenery as far away as I can from the track and the ballast area--which is also good, because scenery too close has been known to derail my trains in the past.

Speaking of track and ballasting, this is the first finished section of track on the layout. I painted the track in the back corner of the the layout and added ballast, near the Devil's Paintpots and geysers, just to experiment with colors and such. It still needs more work (and more ballast).


Back to Balancing Rock Canyon, the track is getting the attention that I described above. In addition to that, I also started wiring that section for the future two-train operation with block control and my experimental automatic train operation (where the last foot of each block is isolated, which will stop a train if there's another train in the block ahead. So, if a train were to go into Balancing Rock Canyon and if there was another train in the next block, the 1 foot dead section of track would cause the train to stop right in front of the tunnel leading to Rainbow Caverns). The wire leads coming from the track are all connected together for a simple single train operation now, but when I do switch to cab control, this prep work that I did will make the switch-over much easier.

The rocks themselves for Balancing rock canyon are also getting some work; I've actually gone back and carved more out of them to make some of the rock towers less blocky and more realistic. I also cut the spinning rock column down so it's a tad shorter and the actual spinning rock was made smaller so it's more in scale. The ground work is going back in and consists of sculptamold with some tint in it so I know when batches of areas were done in terms of drying time. Unfortunately, in the last batch I threw in some celluclay as an experiment (the brown stuff in the right area of the photo below) which didn't work out because the sculptamold set but the celluclay hasn't, so it's this weird kind of spongy surface that I can't really work on just yet. The light yellow areas are the carved areas, which is the exposed foam.


I've also adjusted the color palette and refined my painting process for the desert, which is a little more accurate to the real thing and little more orange than what I've used in the past. This time I'm using paint straight out of the bottle, so no complicated mixes will have to be made (and so patching can be done easily without having to color match). The area below was the first area to use this new painting treatment with Balancing Rock canyon soon to follow.


If anyone is interested, I might post a step-by-step process of painting the rockwork.

Heres a panorama of probably the only finished area on the entire layout and the area being worked on nearby.


I've been thinking about animated the geysers for some time now, and I still haven't found an ideal solution. The obvious one is to have the geysers on cams that go up and down (a solid plexiglas rod will represent the water). But I've also been looking at using mist or fog. I have a fog machine that might work, but trying to fit it in that area isn't easy and it doesn't operate the way I would want it to. It would be idea to have a shot of fog every few minutes for a few seconds, but the fog machine I have doesn't do that. I came across some little fountains that are called "ultrasonic misters" which turns any bowl of water in to a mist. That could work, but I'd have to try it out myself to see how it works and I'm trying to use little to no water at all (and not break my budget in the process). And depending on the model, the actual "geyser" for these fountains doesn't seem to be much so they might not work anyways for what I'm trying to do. We'll see, the geysers are not a priority at the moment anyways.


Lately I've been also planning out the new train for Nature's Wonderland, which might replace the current one or join along side it as #2. This train will be using a new drive system which includes the powered truck from a Bachmann Cable Car and a dummy free-wheeling locomotive in front (just like the real thing!).

I got a Cable Car and I've been fiddling around with it the last week or two figuring out how I'm going to mount it and how it'll work. First off, I couldn't believe how small it was! It was tiny, and it definitely will fit in the current tender that I have for the current train (for consistency the tender and cars will be built to the same specs as the current train) 


But small size comes with a side-effect--weight, and no weight= no traction, something that is an issue on the NWRR. Luckily, since the motor truck is small enough I have plenty of room for weight. The tender drive needs to weigh as much as the current locomotive for the grades that I have tested and planned. The porter (current locomotive) tips the scale at 3.80 ounces and the motor truck comes in at about .80 ounces, so weight really needs to be added. I found my answer with tungsten weights. I found these really small weights made of tungsten that are used for Pinewood Derby cars that I will be using. They measure about 7/16" X 3/8" and they weigh about 0.5 ounces each. A pack of 6 brings the total weight to 3 oz. Adding these to the motor truck makes the future tender drive weighing exactly the same as the porter engine I have now! And since they're so small, I can even fit them standing up below the tender deck (and that doesn't include the higher space on top of the tender for the "hatches") as shown below:


There's room for even more of them! I can fit 3 more if I wanted to as shown below (the extra ones would fit between the two rows)


Even then, there's still room for weight on the sides of the motor truck, under the tender frame and all kinds of other places, but that might be overkill (or is it?).

As for the performance of the motor truck, it'll work, but not out of this world great. The porter still has some advantages though. First off, like any other 4-wheeled locomotive, the power pick-up is terrible unless your track and wheels are *spotless*. No worry, like the current train, more power will be picked up from the two mine cars behind it. Speaking of that, the wiring between the cars is also going to be different on the new train; this time everything will be able to disconnect easily for movement and maintenance, this means I can remove the tender for fixing without having to take off the locomotive in front, and the two cars behind it also (The locomotive, tender, and two cars are counted as "one" on the current train). I'll probably use two-pin micro-connectors for this and I won't have any wires going to the locomotive.

The tender truck, when fed power efficiently, runs ok. I have to realize that it's not from a Spectrum model like my porter, so it's not built with total precision. It's a little noisy compared to the porter, but it runs fairly well with plenty of power. My only problem with it is that it can't handle the ultra-slow speeds like the porter; the porter can run half as slow as the power truck's slowest speed. But, from my tests, the slowest speed for the power truck seems to match those of the real mine train after studying how many times the wheels turn per second on the locomotives. I just have to accept that I can't run the train in sync with the lengthy soundtrack and just have to enjoy running it at a slightly higher speed through the layout.

Here's a quick video showing a test of the power truck with the chassis of a former porter in front. The bag on top of the truck is the tungsten weights, which improves it's traction power and even it's electrical conductivity. The video is a little jerky, thanks to the digital point-and-shoot camera, but you get an idea of how it runs.


Speaking of the porter chassis, that will be the new dummy locomotive to go in front of the powered tender. Since there is no motor to hide, I can finally make an accurate model that's the right size (the locomotive on the current train had to have some proportions changed to accommodate the high sitting motor). And since there's going to be nothing to hide in the boiler, and no wires to feed from the track, how am I going to power the headlight? Answer: batteries. If I were to stash a battery in the boiler like a AAA battery or even a AA battery, I could have a 1.5V bulb (or LED) for the headlight on a switch so I can turn it on and off whenever I want to. That could be really neat, being able to stop at the station at night with the headlight still on or keep it off when running during the day with out using DCC!

So far the new train (and the rest of the layout) is looking pretty good on paper; I'm anxious to seeing it come to fruition.  


December 2009 Update

After completing the massive project below the layout (www.20kmodel.blogspot.com) I'm finally getting back to doing some progress on Nature's Wonderland. The main focus now is to get the track locked down and left alone as I don't want to do anymore track work in the future, it should all be scenic work from then on.

Yesterday I finalized the height of Crossover Point. Crossover Point is the point in the track where it crosses over itself (makes sense!). This is the highest point that the train has to climb and also the lowest point where the train has to duck under it's own track underneath in the Rainbow Caverns.


I set the height of the track above at Crossover Point to the absolute minimum--just a 1/16th gap between the train crossing under and the track above. That shouldn't be too much of a problem, eventually the train I have now will be retired and replaced with one that is shorter in height so that will clear very easily.  The height for Crossover point is at 2.75 inches and so everything has to match that height, mostly in that corner of the layout as shown in the picture above.  Since the track around the geysers and the paintpots is slightly higher than Crossover Point's new height, I knocked out the supports and lowered it about 1/2".


It may look like an earthquake fault line, but here is the newly lowered track in relation to the scenery. I cut that "fault line" so when I lowered the track, it didn't angle outward like a piece of super-elevated track reversed. I lowered that section of scene to match the new height and now it's just some patch work in the crack. The ground of the scenery slopes every so slightly but it's hard to really notice.

Now that the highest point in the layout it locked down, it's time to work backwards down the line all the way to Rainbow Ridge.


Rainbow Ridge is currently a piece of plywood with some flex-track temporarily tacked down with some screws so I could figure out the arrangement. Unfortunately, the spur line that I had planned to go in the Caverns had to be eliminated; the curve was simply too sharp for a turnout in the desired location. But,  I've got an idea on adding another spur line in the desert that I'll get into in another update. Since I'll only have two trains max with only one train at the moment, the double track Rainbow Ridge will do just nicely for now.

As you can see in the photo above, there is plenty of space for a much better Rainbow Ridge. The blue line hovering above the plywood indicates the original edge of the layout before the expansion; anything that wasn't on the table wasn't on the layout!

But before I even get to Rainbow Ridge and all that fun stuff, I have to deal with the track. The grade going into the Desert and over Crossover Point is being a troublemaker again and the joints before and after the Bear Country trestle are making the train stall. I thought it was time to solve this grade/stall problem once and for all. The track from Rainbow Ridge, around Cascade Peak, through the Living Deser and over Crossover point is made up of track that is raised at different gradients (sections here and there were changed over the years and that resulted in different gradations). Before I get to Rainbow Ridge, I want to regrade the entire track from Crossover point, through the desert, over the trestle, around Cascade Peak, through Beaver Valley, and Rainbow Ridge. I want the route through these areas to be absolutely smooth, gradual, and consistant. This way, the train should have no problem at all on any section of that track on it's way upgrade.

So, the last few days I've been doing a lot of math, measuring, and testing to find the right grade to raise the train without causing it to stall out. There 3 main factors in these calculation: Whether or not Rainbow Ridge would have a slope to contribute to the grade; the height of the Bear Country Trestle that results from the grade, and the steepness of the grade itself. The track will raise in increments of 1/8" and the  space between these increments is what establishes the steepness and the other 2 factors.  The train will have to negotiate a height distance of 2.25" (even though the height of crossover point from the base is 2.75", the grade will start 1/2" from the base on that new piece of plywood). From all of my calculations and testing, I came up with 2 plans, each with it's own pros and cons:

Plan A 

  • The grade will start from Point A  and end at Point C/Crossover Point (refer to photo above) and will rise 1/8" every 10.25".
  • Pros:
    •  This is the most subtle and gradual grade which makes it the easiest for the train to climb. 
    • The height of the Bear Country Trestle remains at it's current height of 2" (I want that trestle to have some height; otherwise it'll look lame and un-prototypical).
  • Cons:
    • The entire Rainbow Ridge will have to have a slope as the section is part of the new grade; this isn't easy to hid or build with the number of platforms and buildings that can look odd all leaning to one  side). 
Plan B
  • The grade will start from Point B and end at Point C/Crossover Point (refer to photo above) and will rise 1/8" every 7.7".
  • Pros:
    • Rainbow Ridge will remain perfectly level and flat, which makes it much easier to build with all the platforms, buildings, turnouts and track. Won't have to do any visual tricks with the slope. 
  • Cons:
    • The Bear Country Trestle has a disappointing height of 1 7/8", I don't want the trestle to look lame and un-prototypical. I could "dig down" 1/2" to make it appear taller, but that's nearly impossible to do with the layout screwed down into the table already making it impossible to cut. 
    • The grade is steeper than in the plan above; although the grade from under Crossover Point in Rainbow Caverns to point A is steeper than rising  1/8" every 7.7", I'd rather have the majority of the layout be subtle in gradations. 
I've been testing the two plans above a lot with some pieces of straight track set at those increment distances with a train full of weight (I also testing the train with a 3X the weight and an underweight locomotive, since the newer train I have planned will weigh a little less than my current locomotive). Obviously, the grade in Plan A is easier to climb, but the train was able to do both grades with double the weight of the total future passenger load. I was indecisive with which plan to go with, but I reminded myself why I'm re-grading the track--to make the train run easier.

With that in mind, I'm choosing plan A. Although this plan will make the train run better, it makes construction of Rainbow Ridge a heck of a lot hardre to do; since the track is sloped, I have to figure out what will run parallel with it in terms of the raising height, what will stay level, and what building will have to be level corrected. That's what I'm up to now. Once I figure it out, the track will be re-graded and installed, and I can finally have a trouble-free train completing a full loop.

Progress Report: 10/30/09

At this point, the entire Rainbow Ridge area has been cleared out, as well as a good section of Beaver Valley and Rainbow Caverns. From there I'll install a plywood base along the front to bring everything to the proper height and give the future trackage and scenery a good base to work on. Once the plywood is screwed down, the next thing to be done is figure out the track layout and get that installed. Then it will be construction of Rainbow Caverns (version 4) and then Rainbow Ridge.


Progress Report: 9/17/09


"The Mine Train model will never be complete, as long as there is always something to improve, modify or change"
(a play on Walt's quote)

That certainly is true. What was once a small project of adding a spur line, has now turned into a massive rebuild. It opened up a big can of worms.

But before I get into that, I'd like take a look at what's been done in the desert; the lighting. Since the grade in that section was redone, most of the lighting that was mounted along the track got all screwed up. Having the lights at that low vantage point didn't really help as scenery easily blocked the beams of light. And since I needed to put the ground work back in after I fixed up the balancing rocks, I didn't want to do scenery gingerly around every light. I came up with a solution to fix all of that, using "light towers".


These are, in simple terms, blocks of 2 X 4's with LED's glued to them. This way, I can streamline the lighting by having them all in two areas and not in the actual scenery. I can adjust them easily too without having to dig up the scenery too. These "towers" will be hidden by trees in the future. The amount of light being thrown from these towers has actually been improved since part of the light isn't being caught by the ground anymore.


Perhaps the biggest news this week was this ambitious undertaking that I decided to go with a few days ago, on pretty much the same scale the the big desert redo of last winter. It all started with a spur line:


On the side of the layout I have this space where I've always wanted to put in a spur line to pull a train off onto. This makes it easier for a two train operation, or if I just want to test a non-NWRR locomotive without taking the whole train off the track. The turnout would be located in the caverns, as with the real thing and the spur would exit onto the side of the layout. To install the switch, I had to tear out that wall in the foreground of the caverns. No big deal, it really had nothing on it and it's an easy fix.

Realizing I needed more work room, I tore out more of the cavern walls and eventually sections of the rock works and waterfalls. Pretty much half of the caverns were exposed to daylight now. No big deal, I was going to expand the caverns anyways and the walls were going to be replaced anyways. Suddenly, an idea popped in my head.

Why expand the caverns when I can expand Rainbow Ridge instead?

For years I've been disappointed with the space alloted for the little mining town of Rainbow Ridge. There wasn't enough room for all the buildings and the general spacing of everything was pretty tight. My original buildings were built too small, and new more detailed buildings at a slightly larger, yet more correct, scale were slated to be built at some point. The Rainbow Ridge area is probably one of my favorite, if not the most, section of the whole attraction. With a desire to have a larger town, I began to plan the new Rainbow Ridge (mind you I have yet to finish my little spur line project).

After reviewing some aerial photos and several vintage photos, I was able to determine the amount of space I needed for an entire Rainbow Ridge. The new space for the town would be double of what the old space was. That would allow for a correctly proportioned town with all the buildings and best of all, room for the spur line out front in the load area. (That would make two spur lines to be made; one in the caverns and one in the town; could have a three train operation now!). After some research I decided to go for the expansion. At this time, Rainbow Ridge is already stripped down and ready for it's rather small redo that was originally slated before this craziness.

But expansion comes at a price; Rainbow Caverns would need to be cut down-- a lot. Almost half. It wasn't a big deal after I thought about it; Rainbow Caverns really had a lot of wasted space. The scene could easily be condensed and still have the same effect. However, I've decided to move the viewing window to the side, so I won't have that picture-esque composition with the train making that curve anymore (it's just going to pass in front). There's also some space underneath the future Rainbow Ridge hill where I can expand the caverns and make it deeper. (So essentially, it'll be the same size, just that the volume has moved around).

Also, I will be switching from using a tube blacklight to some UV LED's by Lemax that I picked up from Michael's last year ; these "near-blacklights" are small LED's that give off a nice deep violet glow and make any fluorescent paint glow nicely. It isn't exactly the same effect as a tube UV light, but it's pretty close; as long as the viewer goes "ooohhh!" when they see it, I'll be good. The pack comes with two spot lights made up of 3 LED's each (six in total) that I will dissect and rewire for my own practical use (they'll be hooked up to a transformer too) . Each LED will have it's own mount so I can adjust and point them wherever I want. By using these, I won't have to worry about the bulb burning out (they don't last long) or the batteries going out if I forget to turn it off, which has happened a few times.

So, here's my plan of action:


The yellow line represents the current track (or what use to be the current track) and the red represents the planned new track. The green portal represents where the town starts after the train comes out of the tunnel. The caverns spur line route is also visible.

My to-do list just got longer.