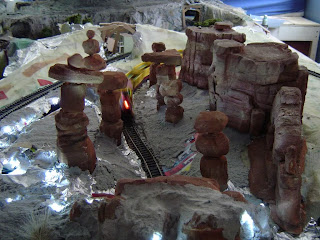
Well, Nature's Wonderland has had yet another set-back--Balancing Rock Canyon. I hoped the day would never come, having to dig up scenery to fix gears and such. Apparently, after having the rocks turn and move for pretty much half a year has put some wear and tear on the mechanism. The axles drenched in lubrication, stress and even the changing weather has affected how the rocks operate and they eventually they stop moving. But that is something that is suppose to happen; when something gets caught in the gears and causes them to stall, I've got a gear that will slip on purpose so that the obstruction doesn't stall out the motor. so when something stops the rocks, the motor keeps running. Now it's gotten to the point where the rocks don't want to move anymore because they're putting to much stress on the slipping gear. And to make matters worse, the axles for a couple of gears and rock column gears gave way because they were surface mounted with hot-glue, and you through in over-lubrication, time, weather, stress and weak points. Also, once the hot-glue finally loses it's grip (what was I thinking using hot glue!), the gears start to shift a little which results in gears binding more, putting more stress on the motor.
So now I've gotten the whole area pretty dug up, with holes cut in the scenery (I've kept the "plugs" so I can make them into access hatches) and a lot of gear axles being replaced. This time I've actually drilled into the wood layout base and inserted longer axle rods, instead of gluing a shorter rod to the surface of the masonite. This way, the gears won't move at all. I've had to remove some of the rock columns, which was a bit painful to do since sealing around them into the surrounding scenery took a lot of time. One column is getting a total refurbishment. Now that I've replaced most of the axles, the whole mechanism runs a little smoother and quieter, so I know the work made a difference.
Hopefully I'll be able to patch the area back up in the next week or so, I've also need to do some patching from the re-grade I did a couple days ago. In the meantime, while everything is still kinda dug up, I might install a sensor used for security lights so the rocks will start moving automatically when the train hits a certain point. I'll have to do some experimenting.


Progress Report: 7/10/09
Well, not really any progress, my 20,000 Leagues under the Sea project is soaking up pretty much all of my time and I'm at a point where I need to do a big supply run, so can't really do much until I have everything I need.
Unfortunately, compromises are great once you figure them out and put them to work. But eventually, they'll come back to bite you in the rear--hard. I've had a couple of setbacks in Nature's Wonderland, but I've overcome a hurtle that I've been wanting to avoid for some time now.
I'm talking about the re-grading I did as part of the great Desert Redo of Winter 2008 (go back a bunch of pages). I raised the grade of the track so the train could pass over itself. Everything worked great in the tests and in the following weeks as scenery went in. Occasionally, the engine's wheels would be on the verge of slipping and that'd be it.
Though now it's gotten ridiculous. I've had a few episodes like this before; the train can't even make it up the grade without slipping. It'll stall out once all the cars are on the inclined track, and this is with an empty load of cars! There's no way it'll be able climb the now nicknamed "Devil's grade" with a full load of resin passengers. It's very frustrating knowing the train can't even make it over the hill and finish it's run.
I've tried everything to correct this, using Bullfrog Snot -- which works great on other locomotive BTW-- cleaning the track constantly, checking for any stuck/sliding wheels, and trying to add more weight to this petite locomotive which is nearly impossible (if you want it to be accurate and look good!).
Then I decided to look at what's causing the problems--the track itself. The only solution would be to re-grade the track again, but that was an option that I really didn't want to carry out. But after some inspections, I found that it could be possible, lowering the track just enough without any major work so that it makes it easier for the train to climb the grade but not necessarily eliminate it.
So yesterday, I pulled back the Rainbow Ridge hill (luckily I didn't scenic it yet!) where the track borders the scenery. I knocked out the roadbed supports and slowly forced the track and roadbed down, careful not to warp the track itself. I managed to lower the track about 1/2 and an inch in one spot and a 1/4 inch where the track passes over the Rainbow Caverns track. I secured the right-of-way in it's new position for testing.
I tested the train loaded with weights to simulate the future passengers. I tested the train with maximum weights and the most the train can pull without slipping is 5 oz. (with 6 oz. on the verge of slipping). That is great improvement considering the weight of the future passengers will only total at about 1.5-1.8 oz. and the fact that the train before couldn't even make it up the grade with no weight at all. I did have to sacrifice not having a whistle on the locomotive so it can clear the overpass in the caverns, but hey that's a detail I can live with out (I could always make a removable one for Photo OP's!). Although I still have to do some rockwork and scenery touch-ups, I think the effort was well worth it.
Problem solved!
(What still puzzles me is how the train was able to do the grade for about 6 months with only a few problems every once in a while. But after thinking about it, here's my theory: when I tore out the old desert, I think that an extremely fine layer of dust settled on the track and allowed for traction when I was doing the first couple of tests. After a couple of runs, I confirmed to myself that it works and it was time for scenery and no adjustments were to be made. I did the tests without weights thinking that the future passengers wouldn't really weigh anything (only to find out that the weight adds up and is enough to affect performance!). Once the dust went away, the train slipped and a new layer of dust from sanding or from outside formed, the train worked again.
From the initial construction, everything worked great. Fast-forward a couple of months and the train starts slipping. At this point I think that dust layer wore off and it's just bare track. Strangely, for some reason, the train starts working up the grade easily a few days later. (could be dust from the changing weather outside)
Fast-forward a couple more months and the train starts slipping again. At this point, I'm trying everything I could and I just set the problem aside and started working on something that doesn't induce headaches and frustrations--working on the arch bridge. I grinded and sanded some areas on it and when I was done, I blew off the dust; but not all of it (invisible stuff). I ran the train through the bridge, knowing it would start slipping in a few seconds and miraculously, the train chugs up the hill once again.
Fast-forward a few more months to 2 days ago, and you guessed it, the train slips on the grade and stalls. At this point it's getting ridiculous and I'm not going to purposely spread dust on the track for traction. As explained above, I successfully adjusted the track and I can now breathe a sigh of relief that I won't have anymore problems in future (or so I thought...) )
Unfortunately, compromises are great once you figure them out and put them to work. But eventually, they'll come back to bite you in the rear--hard. I've had a couple of setbacks in Nature's Wonderland, but I've overcome a hurtle that I've been wanting to avoid for some time now.
I'm talking about the re-grading I did as part of the great Desert Redo of Winter 2008 (go back a bunch of pages). I raised the grade of the track so the train could pass over itself. Everything worked great in the tests and in the following weeks as scenery went in. Occasionally, the engine's wheels would be on the verge of slipping and that'd be it.
Though now it's gotten ridiculous. I've had a few episodes like this before; the train can't even make it up the grade without slipping. It'll stall out once all the cars are on the inclined track, and this is with an empty load of cars! There's no way it'll be able climb the now nicknamed "Devil's grade" with a full load of resin passengers. It's very frustrating knowing the train can't even make it over the hill and finish it's run.
I've tried everything to correct this, using Bullfrog Snot -- which works great on other locomotive BTW-- cleaning the track constantly, checking for any stuck/sliding wheels, and trying to add more weight to this petite locomotive which is nearly impossible (if you want it to be accurate and look good!).
Then I decided to look at what's causing the problems--the track itself. The only solution would be to re-grade the track again, but that was an option that I really didn't want to carry out. But after some inspections, I found that it could be possible, lowering the track just enough without any major work so that it makes it easier for the train to climb the grade but not necessarily eliminate it.
So yesterday, I pulled back the Rainbow Ridge hill (luckily I didn't scenic it yet!) where the track borders the scenery. I knocked out the roadbed supports and slowly forced the track and roadbed down, careful not to warp the track itself. I managed to lower the track about 1/2 and an inch in one spot and a 1/4 inch where the track passes over the Rainbow Caverns track. I secured the right-of-way in it's new position for testing.
I tested the train loaded with weights to simulate the future passengers. I tested the train with maximum weights and the most the train can pull without slipping is 5 oz. (with 6 oz. on the verge of slipping). That is great improvement considering the weight of the future passengers will only total at about 1.5-1.8 oz. and the fact that the train before couldn't even make it up the grade with no weight at all. I did have to sacrifice not having a whistle on the locomotive so it can clear the overpass in the caverns, but hey that's a detail I can live with out (I could always make a removable one for Photo OP's!). Although I still have to do some rockwork and scenery touch-ups, I think the effort was well worth it.
Problem solved!
(What still puzzles me is how the train was able to do the grade for about 6 months with only a few problems every once in a while. But after thinking about it, here's my theory: when I tore out the old desert, I think that an extremely fine layer of dust settled on the track and allowed for traction when I was doing the first couple of tests. After a couple of runs, I confirmed to myself that it works and it was time for scenery and no adjustments were to be made. I did the tests without weights thinking that the future passengers wouldn't really weigh anything (only to find out that the weight adds up and is enough to affect performance!). Once the dust went away, the train slipped and a new layer of dust from sanding or from outside formed, the train worked again.
From the initial construction, everything worked great. Fast-forward a couple of months and the train starts slipping. At this point I think that dust layer wore off and it's just bare track. Strangely, for some reason, the train starts working up the grade easily a few days later. (could be dust from the changing weather outside)
Fast-forward a couple more months and the train starts slipping again. At this point, I'm trying everything I could and I just set the problem aside and started working on something that doesn't induce headaches and frustrations--working on the arch bridge. I grinded and sanded some areas on it and when I was done, I blew off the dust; but not all of it (invisible stuff). I ran the train through the bridge, knowing it would start slipping in a few seconds and miraculously, the train chugs up the hill once again.
Fast-forward a few more months to 2 days ago, and you guessed it, the train slips on the grade and stalls. At this point it's getting ridiculous and I'm not going to purposely spread dust on the track for traction. As explained above, I successfully adjusted the track and I can now breathe a sigh of relief that I won't have anymore problems in future (or so I thought...) )
Progress Report: 6/14/09
More night time lighting has been installed, desert lighting is pretty much done, though I'm probably going to add some bright 12 volts here and there to kind of brighten up the scene a little more, "exaggerate" the lighting a bit (I'm sure NWRR wasn't lit up this much, but it's kind of my own little touch)

The white bulbs are still awaiting colored gels at the moment. Also, I rigged the lights on a timer so they'll click on at sundown and shut off when I hit the sack, and then they turn on again in the morning for an hour or two as if the lights were on all night.
In other news, I gave my locomotive some "Bullfrog Snot" to improve traction. I'll do a full review of it later in another thread
This is the current area that's being worked on, the back of the desert:
(this is a supersize image, so click on it to see more detail!)

The little section on the right where the two LED's are is where the Dinosaur bones are going. I'll probably have to sculpt it, since I couldn't find any kits that were the right size or quality (or even the right dino!)
Beaver Valley and Bear Country were ripped up today, or rather the beat-up, torn, and yellowed newpaper forms that were there were ripped out. This area has been considered the "trash dump" because whenever an area was redone, all the debris was dumped into there to clear the space. Once Rainbow Ridge is complete (once the desert is complete!) progress will move into this area. It'll be interesting to figure out, considering Rainbow Ridge, Beaver Valley, Bear Country, Cascade Peak, and Natural Arch Bridge are all in very close proximity with each other unlike the real thing. I have to kind of separate the areas to a certain extant. I'll have to get creative with trees...
(Another SuperSize image!)


The white bulbs are still awaiting colored gels at the moment. Also, I rigged the lights on a timer so they'll click on at sundown and shut off when I hit the sack, and then they turn on again in the morning for an hour or two as if the lights were on all night.
In other news, I gave my locomotive some "Bullfrog Snot" to improve traction. I'll do a full review of it later in another thread
This is the current area that's being worked on, the back of the desert:
(this is a supersize image, so click on it to see more detail!)

The little section on the right where the two LED's are is where the Dinosaur bones are going. I'll probably have to sculpt it, since I couldn't find any kits that were the right size or quality (or even the right dino!)
Beaver Valley and Bear Country were ripped up today, or rather the beat-up, torn, and yellowed newpaper forms that were there were ripped out. This area has been considered the "trash dump" because whenever an area was redone, all the debris was dumped into there to clear the space. Once Rainbow Ridge is complete (once the desert is complete!) progress will move into this area. It'll be interesting to figure out, considering Rainbow Ridge, Beaver Valley, Bear Country, Cascade Peak, and Natural Arch Bridge are all in very close proximity with each other unlike the real thing. I have to kind of separate the areas to a certain extant. I'll have to get creative with trees...
(Another SuperSize image!)

Progress Report: 6/9/09
This back corner is starting to shape up very nicely. The geysers are complete and colorful swirls in the sand from the paint pots appear. The "spur line" tunnel is also complete.

A POV shot from the train; I can't wait until I get a backdrop in!

Progress is going to move towards the back of the desert, towards the Dinosaur remains and the small pond that is there right up to the Natural Arch Bridge. Tonight while it's dark, more night-time lighting will be installed, and eventually I'll be able to put in the stretch of DLRR!

A POV shot from the train; I can't wait until I get a backdrop in!

Progress is going to move towards the back of the desert, towards the Dinosaur remains and the small pond that is there right up to the Natural Arch Bridge. Tonight while it's dark, more night-time lighting will be installed, and eventually I'll be able to put in the stretch of DLRR!
Progress Report: 6/3/09
Taking a break from the Arch bridge (I have to let it dry for a day or two!) I went over the Cactus Forest. I bought one of Woodland Scenic's 'Scene-A-Rama' kits, the Desert Plants pack. Included are a variety of plastic cacti that were just right for my model. They were about the right size and all they needed was a coat of painted and their "flower" applied. I gonna get some more of these packs, I might even mold the next set of cacti I get. These packs are great for beginner modelers or modelers that just want a variety of materials for a section of their layout.


Progress Report: 6/2/09
Progress slowed just a tad, but stuff is still going on. Worked on the Natural Arch bridge. This is the fourth incarnation, with the first one built on the original layout in 2005, rebuilt in 2006 for the added mule path, torn out and replaced with the big Desert redo of winter '08, and then replaced yet again with the current one (the one before it, even though was brand new, gave me some envelope clearance issues).
The new Natural Arch Bridge is made out of a rigid wood structure draped in aluminum foil and then covered in a layer of celluclay. Celluclay is dry papier mache type material that turns into a malleable wet clay when water is added. Even though it take a few days to dry, it forms a very hard and appropriately textured surface. Here is the bridge already with a layer of set celluclay on it--the light colored stuff-- and some fresh stuff applied today--the dark. (Look you can even see the big 'ol bag of dry celluclay in the back; this stuff ain't cheap--$25 a bag! But hey, it works pretty good)

The new Natural Arch Bridge is made out of a rigid wood structure draped in aluminum foil and then covered in a layer of celluclay. Celluclay is dry papier mache type material that turns into a malleable wet clay when water is added. Even though it take a few days to dry, it forms a very hard and appropriately textured surface. Here is the bridge already with a layer of set celluclay on it--the light colored stuff-- and some fresh stuff applied today--the dark. (Look you can even see the big 'ol bag of dry celluclay in the back; this stuff ain't cheap--$25 a bag! But hey, it works pretty good)

Progress Report: 6/2/09
Progress slowed just a tad, but stuff is still going on. Worked on the Natural Arch bridge. This is the fourth incarnation, with the first one built on the original layout in 2005, rebuilt in 2006 for the added mule path, torn out and replaced with the big Desert redo of winter '08, and then replaced yet again with the current one (the one before it, even though was brand new, gave me some envelope clearance issues).
The new Natural Arch Bridge is made out of a rigid wood structure draped in aluminum foil and then covered in a layer of celluclay. Celluclay is dry papier mache type material that turns into a malleable wet clay when water is added. Even though it take a few days to dry, it forms a very hard and appropriately textured surface. Here is the bridge already with a layer of set celluclay on it--the light colored stuff-- and some fresh stuff applied today--the dark.

The new Natural Arch Bridge is made out of a rigid wood structure draped in aluminum foil and then covered in a layer of celluclay. Celluclay is dry papier mache type material that turns into a malleable wet clay when water is added. Even though it take a few days to dry, it forms a very hard and appropriately textured surface. Here is the bridge already with a layer of set celluclay on it--the light colored stuff-- and some fresh stuff applied today--the dark.

Progress Report: 5/29/09
Here's a quick video I did of the layout, showing progress so far, but mainly to show everything's locations in relation to one another.

Progress Report: 5/24/09
I'm really starting to haul on this project! I don't think I'm stopping anytime soon! Last night I started installing colored gels for the night-time lighting:
The shot is a bit blurry, since the rocks are moving

Here is a pano shot of the current focused construction area, the geysers and paint pots. The geysers are plexiglas rod with some Halloween stretchy web stuff on them. The only problem is, unlike the real geysers. is that this stuff is green and glows in the dark! I might try and spray them with some white, to change the color and stiffen them up a bit.

I still might mechanize them in the future, but since I need to get a motor for them, they'll just be static for now.
The shot is a bit blurry, since the rocks are moving

Here is a pano shot of the current focused construction area, the geysers and paint pots. The geysers are plexiglas rod with some Halloween stretchy web stuff on them. The only problem is, unlike the real geysers. is that this stuff is green and glows in the dark! I might try and spray them with some white, to change the color and stiffen them up a bit.

I still might mechanize them in the future, but since I need to get a motor for them, they'll just be static for now.
Progress Report: 5/24/09
Despite saying there hasn't been much progress, in the last two days there HAS been progress! The gears in Balancing rock canyon have been sealed up, which looks neat seeing the rocks move in way without seeing the gears turning. The gray stuff is celluclay which should harden up in few days and will get some earth tones soon.
Ground cover is starting to go in and Devil's paint pots of sculpy were made.

The geysers were also made of sculpey, here they are awaiting paint. I had a little mishap with the oven (I had it set to 'toast' rather than 'bake') so two of the geysers were a little burnt. The geyser in the rear is bright orange because I switched to a cheaper clay when I ran out of the other stuff (the orange stuff glows in the dark!)


Ground cover is starting to go in and Devil's paint pots of sculpy were made.

The geysers were also made of sculpey, here they are awaiting paint. I had a little mishap with the oven (I had it set to 'toast' rather than 'bake') so two of the geysers were a little burnt. The geyser in the rear is bright orange because I switched to a cheaper clay when I ran out of the other stuff (the orange stuff glows in the dark!)

Progress Report: 5/20/09
Not too much progress, been busy working on my On30 Marsh and a 20,000 Leagues under the Sea project below Nature's Wonderland. But so far:
• Locomotive got a mechanical tune-up, though an appearance overhaul may be needed--the wheels are looking a little shabby.
• A prototype mechanism for jumping fish was created, though that little project quickly lost momentum once I realized how small 1/48 fish really are. ( basically they'll be a little chunk of styrene, very disappointing)
• The styrene rod drive shaft for the spinning rock finally snapped and a brass rod was installed; I guess a styrene rod flexing every second per revolution, multiplied by a quarter of million times, is bound to snap!
• Locomotive got a mechanical tune-up, though an appearance overhaul may be needed--the wheels are looking a little shabby.
• A prototype mechanism for jumping fish was created, though that little project quickly lost momentum once I realized how small 1/48 fish really are. ( basically they'll be a little chunk of styrene, very disappointing)
• The styrene rod drive shaft for the spinning rock finally snapped and a brass rod was installed; I guess a styrene rod flexing every second per revolution, multiplied by a quarter of million times, is bound to snap!
Progress Report: 3/5/09
Here it is, the time lapse construction of the Rainbow Caverns!
This is probably the last one I'll do, since having a camera in your way while you work is not helpful! Plus, I'm not sure what else I would document that would look good sped up. We'll see.
This is probably the last one I'll do, since having a camera in your way while you work is not helpful! Plus, I'm not sure what else I would document that would look good sped up. We'll see.
Progress Report: 3/4/09
Started installing some night-time lighting:

I'm using up leftover strands of white LED's that I was going to use for the Christmas tree base, but canned that at the last minute. I will put some red/orange gels in front of the lights, to give off a glow like how Big Thunder is lit today. Through some Photoshop, it might turn out like this when I'm done:


I'm using up leftover strands of white LED's that I was going to use for the Christmas tree base, but canned that at the last minute. I will put some red/orange gels in front of the lights, to give off a glow like how Big Thunder is lit today. Through some Photoshop, it might turn out like this when I'm done:

Progress Report: 2/28/09
Here's what the caverns look like outside. The caverns are housed in a large hill, with a window on the side looking into it, like a cut-away view.

The flat roof on the top is removable, and it will soon be covered with miniature AC's, piping and vents--to give a sense of reality that Rainbow Caverns was once in a large show building.

The flat roof on the top is removable, and it will soon be covered with miniature AC's, piping and vents--to give a sense of reality that Rainbow Caverns was once in a large show building.
Progress Report: 2/27/09
Rainbow Falls--

The train making its way through, with a long exposure

The Rainbow caverns is pretty much complete, the water of 'Mod Podge' will clear up and glow in a few weeks (I put on a thick layer). In the mean time, I'm cutting together the time lapse construction--over 10 hours of it; gotta make it so it's under 6-10 minutes!

The train making its way through, with a long exposure

The Rainbow caverns is pretty much complete, the water of 'Mod Podge' will clear up and glow in a few weeks (I put on a thick layer). In the mean time, I'm cutting together the time lapse construction--over 10 hours of it; gotta make it so it's under 6-10 minutes!
Progress Report: 2/17/09
Work is getting done in the caverns:

Everything painted black, ready for the next step:
(painting would have been a lot easier if I would have installed pre-painted foil, instead of having to paint already installed foil in a cramped, small area with spots that can be easily missed!)

The intent is to make this area look almost exactly like this photo:

The only difference is that the column shown in the pictures above is actually a support for the roof, so compromises will have to be made. But overall, it should look very similar to the photo above.
Progress is being documented with time lapse again, like my last video, so it'll be neat to see it get built in a couple of minutes from start to finish when I'm done.

Everything painted black, ready for the next step:
(painting would have been a lot easier if I would have installed pre-painted foil, instead of having to paint already installed foil in a cramped, small area with spots that can be easily missed!)

The intent is to make this area look almost exactly like this photo:

The only difference is that the column shown in the pictures above is actually a support for the roof, so compromises will have to be made. But overall, it should look very similar to the photo above.
Progress is being documented with time lapse again, like my last video, so it'll be neat to see it get built in a couple of minutes from start to finish when I'm done.
Progress Report: 2/8/09
I've got a time lapse video of the construction from the ground up of the tunnel entrance leading to the Rainbow Caverns!
(I wish I could actually work that fast; I could get the layout done next week!)
(I wish I could actually work that fast; I could get the layout done next week!)
Progress Report: 2/3/09
Nature's Wonderland is now in a different room! This is the second move for the layout, and through negotiations with other members of the house, I was able to obtain a larger room for the layout (and eventually, a larger table twice the size of the old will be underneath the layout and will house a new "crawl-through" attraction in the future). This will allow for extra expansion room around the layout, so that will give me plenty to do.
But in the meantime, the rocks have been painted:

The train heading through the canyon. "Now folks we gotta get through balancin' rock canyon, look out they're startin' to tumble!"

I'm planning to do a time-lapse video of the construction of the rocky portal tunnel show above, to show all the steps that go into these rocks. Also planned is an ambitious time-lapse video of the entire construction of the Rainbow Caverns from blank masonite to finished black-lit cave. So those will be neat if I get to them and actually do them. I'd do more video documentation, but that is almost twice the work for a project for one person. But we'll see.
But in the meantime, the rocks have been painted:

The train heading through the canyon. "Now folks we gotta get through balancin' rock canyon, look out they're startin' to tumble!"

I'm planning to do a time-lapse video of the construction of the rocky portal tunnel show above, to show all the steps that go into these rocks. Also planned is an ambitious time-lapse video of the entire construction of the Rainbow Caverns from blank masonite to finished black-lit cave. So those will be neat if I get to them and actually do them. I'd do more video documentation, but that is almost twice the work for a project for one person. But we'll see.
Progress Report: 1/20/09
Been doing some MAJOR work in the Balancing rock area. Got all the rocks made and installed, and they all move!! I pulled back some of the paper mache and installed some K'nex gears all powered by one Lego motor. All of these gears, 18 of them, power seven columns of rocks, each with a piece of flexible plastic tubing in them. In this plastic tubing, a metal rod bent at different angles is driven by the gear and the different bends in the rod as it turns moves the rocks. The plastic tubing basically protects the inside of the foam from the metal rod and it keeps the foam rocks from spinning with the rod

Here's a video of the rocks in action:
They are a little shaky, but that is because they haven't be permanently installed, they will run a little smoother when they are installed permanently and the "ground" is put back in.

Here's a video of the rocks in action:
They are a little shaky, but that is because they haven't be permanently installed, they will run a little smoother when they are installed permanently and the "ground" is put back in.
Progress Report: 1/18/09
Been working on the back corner of the layout yesterday. I still need to make some adjustments on it after reviewing some photos though.

Shot with the train making the curve.

The next step after this is to start on the balancing rock canyon. I'm probably going to start on a prototype today to see if my technique will work (Each teetering column will have a rotating vertical rod with bends in it; as the bends move through the rocks, the rocks will move in a sorta random way, resulting in more animation than more older ones with the string and the spring movement)

Shot with the train making the curve.

The next step after this is to start on the balancing rock canyon. I'm probably going to start on a prototype today to see if my technique will work (Each teetering column will have a rotating vertical rod with bends in it; as the bends move through the rocks, the rocks will move in a sorta random way, resulting in more animation than more older ones with the string and the spring movement)
Progress Report: 1/14/09
Rock formations are in place, temporarily, and the papier mache is patched up. They are sitting are specially cut platforms that follow the contours. Makes it easier for removal for painting.

Painting might be the next step, but I think I might want to go somewhere else on the layout this week.

Painting might be the next step, but I think I might want to go somewhere else on the layout this week.
Progress Report: 1/11/09
To show how these formation are created, I've documented the making of the Natural Arch.
First I stacked a bunch of thin blocks to get a very rough shape. I glued all the blocks together in the middle with hot glue. Then I drew a rough top view on the top of the block.

I cut the whole block on the band saw.

Next I carved and smoothed out corners and edges using the same kind of tool shown in the photo in the post above.

Then I carved out the indents and details, and later took a wire brush and carved some subtle horizontal lines. Also, I hit it with a real rock to give it a little bit of that rock texture.

After that, a layer of paint should seal it up.
First I stacked a bunch of thin blocks to get a very rough shape. I glued all the blocks together in the middle with hot glue. Then I drew a rough top view on the top of the block.

I cut the whole block on the band saw.

Next I carved and smoothed out corners and edges using the same kind of tool shown in the photo in the post above.

Then I carved out the indents and details, and later took a wire brush and carved some subtle horizontal lines. Also, I hit it with a real rock to give it a little bit of that rock texture.

After that, a layer of paint should seal it up.
Progress Report: 1/10/09
Did some carving today:

Much better than the original papier mache versions. Studied the heck out of those formation through old photos. The amazing thing is is that these rock formations are still at the park today.
The aluminum sheets have been covered with a layer of Papier Mache (Paper towels dipped in 50:50 ratio glue and water). Still need to do a bit more and patch some areas (where the structures for the mesas/buttes use to be, before I decided to do them out of foam).

Gonna work on the 2nd natural arch bridge tomorrow! (The one that the train doesn't go through nor the mules go over)

Much better than the original papier mache versions. Studied the heck out of those formation through old photos. The amazing thing is is that these rock formations are still at the park today.
The aluminum sheets have been covered with a layer of Papier Mache (Paper towels dipped in 50:50 ratio glue and water). Still need to do a bit more and patch some areas (where the structures for the mesas/buttes use to be, before I decided to do them out of foam).

Gonna work on the 2nd natural arch bridge tomorrow! (The one that the train doesn't go through nor the mules go over)
Progress Report: 1/08/09
Sorry for the blurry photo, but the frame work has been wrapped in aluminum foil. This will help support the paper mache layer, so that the material doesn't droop between slats and holes.
Feels like some weird low-budget sci-fi miniature movie set!

Here's an "artsy" shot, taken from the tunnel to Rainbow Caverns:

Feels like some weird low-budget sci-fi miniature movie set!

Here's an "artsy" shot, taken from the tunnel to Rainbow Caverns:

Progress Report: 1/6/09
I've got the basic, rough form of the land forms built up; the new desert is starting to take shape. I still need to add the two mesas and a few other things then I can add the aluminum foil to start blocking in more details. At this point, I feel like I'm working on a Frank Gehry project...

Approx. 600 popsicle sticks have been used for the frame work (No, I didn't eat every one of them from a box of popsicles! If that were the case, I'd eat three, then resort to the heat gun. I bought a box of 1000 from Michael's, which should be enough)
You can also see the "show building", which will house the new Rainbow Caverns, made from some old sentra signs. The roofs pop off so I can access the inside, and will eventually be dotted with some miniature air conditioners and piping.

Approx. 600 popsicle sticks have been used for the frame work (No, I didn't eat every one of them from a box of popsicles! If that were the case, I'd eat three, then resort to the heat gun. I bought a box of 1000 from Michael's, which should be enough)
You can also see the "show building", which will house the new Rainbow Caverns, made from some old sentra signs. The roofs pop off so I can access the inside, and will eventually be dotted with some miniature air conditioners and piping.
Progress Report: 1/4/09
With school starting back up in the next week (AHH!!) I though I'd get a big chunk of Nature's Wonderland worked on before the week is out. Before I know it, my free time won't be much soon.
The biggest part of the project for the week is the redo of the Living Desert and Rainbow Caverns. This started with a complete tear out of the areas last Thursday.

As I stared at the rubble after demolition, I felt like Tony Baxter tearing down the old Fantasyland in '83 and thinking "what have I done!?".
I soon pressed on, forgetting about the old desert, which wasn't much at all; just a bunch of painted yellowed newpaper paper mache (this is original stuff; from 4 years ago) and some mediocre balancing rocks.
I didn't miss the caverns either; A bunch of over-painted stalagmites and water features that can be significantly updated and done better. Also, the non-removable roof was a major design flaw, something that is a requirement in the future. I also want to change the layout of the water features, making it look more like the real thing; more specifically, like this shot:

I cleaned up, and got ready for re-grading the track.

Now I no longer have that annoying 90 degree cross! This allows for a smoother ride (for the miniature people of course!), a possibility for a two train operation, and its more accurate to the real thing.
Most of the Desert track loop stayed, the only brand new sections are the grade from the trestle to the top of the new tunnel, and from the bottom of the Balancing Rock Canyon, and through Rainbow Caverns to Rainbow Ridge.

Just for kicks, here's the same angle, but from December of 2005:

Both of those shots were taken from the top of Cascade Peak (quite a good tripod if you ask me!)
Despite the new and steeper grades, the train chugs up the hills without a problem, which was a major concern for me. In addition to that, the train now runs a lot smoother, thanks to the extra electrical contacts in the trailing mine cars. (I only electrified two cars even though I was planning on 6 cars to pick up power; I changed that once the two worked well and discovering that installing pick up shoes is a lot of work!)
For the next week, I will be creating the new rock formations and land forms, but mainly starting on a foundation of popsicle sticks, aluminum foil, paper mache, and celuclay. I will soon be back to where I was before the tear-out.
Hey, if Walt can redo his desert in 1960, why can't I, right?
This time, I took more time in researching and figuring out where everything goes (something I didn't do when I first built the layout) It may not look like much, but here is my plan of action at this point.

(The yellow represents the new sections of track, the red represents the old/current track)
In other, more "constructive", news, the new fleet of mine cars are complete, and I am pleased by how they came out.

At the time these shots were taken, the coupler pockets on the cars were not painted, neither were the drawbars.
A close up of one of them:

Progress Report: 12/24/08

Here are the seven new mine cars, all assembled to a certain extent. The next step is to add a few details like the support bars and the seats. Then it's off to the paint shop for a few shiny coats of Boyd Smoothster Yellow. Then the cars will get their electrified wheel sets (except for the last car-shown in the tunnel-; that car is removable).
My goal for my winter break is to get the entire Rainbow Ridge area cleaned up and fully "sceneiked" which includes building a new load platform to accommodate the new cars, rebuild all the buildings to better scale, proportions, and details (I made those 4 years ago!), and the hill behind it should get some work to make it realistic.
Progress Report: 12/15/08
he new prototype car for the new fleet of "Mark IV" mine cars has been completed. The parts for the car have been molded in silicone, and I should start some castings pretty soon. Eventually I'll have a 6 car train where every car is identical! I use to scratch build every car, and that resulted in somewhat accurate cars that were slightly different from one another!
With the smaller car, I can fit more cars at the station, so I'll be able to have an accurate train of 6 cars (technically, that is somewhat accurate, since there were 6 cars on the mine train when it opened in 1956. However, there were seven cars for Nature's Wonderland, so I'll have to make an extra car that can be detached easily, even if the train doesn't entirely fit in the station; to make it totally accurate.)

This photo shows how off I was all these years scale-wise ( I built three generations of these cars at that size!)

.
With the smaller car, I can fit more cars at the station, so I'll be able to have an accurate train of 6 cars (technically, that is somewhat accurate, since there were 6 cars on the mine train when it opened in 1956. However, there were seven cars for Nature's Wonderland, so I'll have to make an extra car that can be detached easily, even if the train doesn't entirely fit in the station; to make it totally accurate.)

This photo shows how off I was all these years scale-wise ( I built three generations of these cars at that size!)

Progress Report: 12/17/08
I've started casting mine car parts. While it looks like a lot of unassembled cars, out of the 11 castings, only about 6 are satisfactory.

The hardest parts to cast are the "steel frames", because the brackets are so tiny and fragile, they'll either break or resin won't get in the mold at all.
For those of you unfamiliar with the anatomy of the mine car, the wheels are mounted onto a rigid steel frame. This frame has 6 brackets, 3 on each side that bolt onto the wooden part of the car, which the main body where the passengers sit. While the prototype has its wheels on the steel frame, mine are actually standard HO scale wheel truck that snap onto the bottom floor of the car; the steel frame is just for show, but it's an important detail.

The hardest parts to cast are the "steel frames", because the brackets are so tiny and fragile, they'll either break or resin won't get in the mold at all.
For those of you unfamiliar with the anatomy of the mine car, the wheels are mounted onto a rigid steel frame. This frame has 6 brackets, 3 on each side that bolt onto the wooden part of the car, which the main body where the passengers sit. While the prototype has its wheels on the steel frame, mine are actually standard HO scale wheel truck that snap onto the bottom floor of the car; the steel frame is just for show, but it's an important detail.
Progress Report: 11/28/08
It has now been a week since I applied the Mod Podge, and its starting to clear up. There are still some white areas which indicate thicker areas, which should be clear in probably less than another week.

I should be starting on the "Mark IV" mine cars pretty soon, so I could finally get a full train. Then I can determine if I need to re-do the desert.

I should be starting on the "Mark IV" mine cars pretty soon, so I could finally get a full train. Then I can determine if I need to re-do the desert.
Subscribe to:
Posts (Atom)


